Monday, 10 May 2010

May Altered Element upcycle projects

Lynne from the Altered Element sent me 3 broken necklaces to alter this month. So far I have made two upcycle projects, but there may be more in the pipeline!


I took the top necklace apart, and painted some of the beads and have used them as 'feet' on another project. I took the middle necklace apart and re-assembled some of the components to form the basis of a wall hanging. The bottom necklace is made from small seed beads and rectangular pieces of coloured shell, and I have saved the seed beads for another day but used the shell in the second upcycle project.

I removed most of the beads and some of the fixings, and re-assembled the 3 wooden rings with some of the jump rings and decorative rings.


I painted all the metal and wood with the Crafty Notions copper glaze Lynne sent in the DT pack. I 'marbled' the bead using the same glaze, but it doesn't show that well on the picture (click to enlarge).


I made some background paper by spraying cardstock with the Crafty Notions colour spray, then stamping into it whilst wet - this 'clumps' the mica into the patterns made by the stamp.


I cut circles from the background paper, and circles from photo transparencies, and mounted these inside the 'frames' for the front of the hanging.


For the back of the hanging, I punched some flower shapes from the background paper, and added circles cut from Crafty Individuals transparencies.


For the second project, I decided to make a mosaic. I soon realised that the small frame Lynne sent in the DT pack was just the right size to use with the shell pieces.


I used the Crafty Notions gilding flakes in the DT pack to give the frame some glitz and glamour, then glued the shell pieces into the frame. I added purple microbeads to the gaps between the shell pieces.


I stamped a face onto the shell using Stazon, to finish it off. And then I realised the frame was recessed on both sides, so the other side couldn't be left bare!


For the other side, I used a Crafty Individuals image (which fitted the frame exactly), and coated it with gel medium, brushing vertically and horizontally with a fine bristled brush. This gives the appearance of 'canvas'. I then added the tiniest amount of Treasure Gold (whitefire) to catch the high points to bring out the texture.


Saturday, 8 May 2010

Woo Hoo - Altered Element design pack for May


Well, I wonder if Lynne knows it is my birthday tomorrow? The postman just bought a purple parcel from the Altered Element, which has so many lovely goodies inside that it feels like a birthday gift!

My upcycle challenge for May is 'broken jewellery', and there are the remnants of 3 broken necklaces. One idea immediately sprang to mind for some of the middle necklace, and another idea for some painted beads in the top one wasn't far behind. The third necklace is seed beads and shell pieces, I'll have to ponder that for a while.


The design team project materials are in my favourite colours of turquoise and copper - a Crafty Notions creative colour Spraypaque Turquoise and a Crafty Notions copper Rainbow Glaze. Along with the colours, Lynne has sent round and square paper mache frames with hanging eyes, a tube of richly coloured metallic/iridescent Czech glass beads, some Crafty Notions variegated copper gilding flakes, some Sculpey Studio antique gold polymer clay, and a lovely Crafty Notions Karantha Stamp (I love these as they are nice and deep and are great to use with Friendly Plastic and Polymer Clay).


My thinking cap is ON!

Saturday, 1 May 2010

Friendly Plastic supplies

Somebody posted a question on my blog 'Guest Book', asking where I get my Friendly Plastic from.

There are 3 reliable places in the UK who carry a wide range of colours and enough stock not to disappoint:

Altered Element - who also sell all manner of other fabulous goodies - http://www.alteredelement.co.uk/epages/es108190.sf/en_GB/?ObjectPath=/Shops/es108190_es119921283844/Categories/Friendly_Plastic

Liz Welch - who also does FP classes - http://www.rarebird.ltd.uk/FPshop.html

and

The Frame Workshop - http://www.theframeworkshop.co.uk/friendly-plastic

and I have never had a 'snapper' or faulty stick from any of them! Snappers are no good to work with. Always check your FP sticks before using them by bending them so that the ends touch - if they do this without snapping they are fine to use. If they snap, you may as well just put them in the bin, as they won't behave themselves when you're trying to work with them!

The 'snappers' are just born that way - it's not an age thing. Apparently the product was originally developed for a non-craft purpose and was not intended to be melted and re-melted, and if the formula is just a tiny bit different the sticks are crumblier and snap rather than being very flexible.

Monday, 5 April 2010

Nature themed paperbag book

I have been taking part in an international collaborative paperbag book, on the theme of 'Nature'. Each player made 2 sets of 12 pages, and mailed them to the hostess, who swapped them out, and sent each player some brown paper bags to help us turn the assorted pages into books.

I coloured the edges of my paper bags with Starburst Stains.


I bound the bags with the open ends alternating, and the binding being about 3/4 inch from the stubby end of the bag - leaving the stubby end as a 'half' page, as seen above. The binding was very simple, I just made 2 holes, and threaded the thread between the holes and around the ends, then tied the threads together and trimmed the ends off. I made 5 pages from decorated folded card to attach to the stubs, and added Nature themed quotations to those pages.

I stuck half my pages back to back with tabs in between, to go into the 'pockets' created by the paper bags, and stuck the remainder on the bare pages. I added covers made from painted & collaged canvas, and added a little bronze German Scrap trim. Here's a picture of the spine of the book, showing the binding thread.

I made 3 bundles of fibres in the colours of the covers, and threaded them through the binding threads, and tied them together in a half knot. This picture shows the cover with 2 bundles added. They cover the binding thread nicely!


I added some letters to the cover, along with a lovely little rusty lizard who came home with me from last year's trip to Arizona. I'm really glad I've managed to bind everybody's gorgeous pages into a book which looks nice - I did wonder if I'd end up with another UFO at the back of the bookshelf....


All I have to do now is bind last year's Meander pages, and the Angel chunky book pages from the year before...

Sunday, 4 April 2010

Metal squares 'screen'

I was in a metal squares swap on UKArtSwaps yahoo group, where we swapped 2 inch metal squares, and part of the swap was that we also had to create an item on which to display our squares.

I decided to create a Beryl Taylor style accordion screen. Beryl's original screen was white, and was the subject of an article in issue 10 or 11 of Cloth Paper Scissors.


I decided that the colours of the metal squares would be best complemented with shades of violet and turquoise. I made a sheet of fabric paper by gluing paper napkins onto an old pillowcase, covering with tissue paper, and painting with watered down Golden fluid acrylic paints before the glue dried. I cut the fabric paper into 12 oblongs, and sewed buttons onto 6 of them, before backing them with felt.

I tore some hot press watercolour paper into oblongs, before colouring it with watered down colourwashes. I sewed these onto the fabric paper backed with felt.

I made some 'joints' by dyeing and sewing some of the pillowcase into 'sleeves' for the wood dowel. I coloured the dowels with Adirondack colourwash in Stream. I glued the 'sleeves' to the back of the felt, and backed with the fabric paper, before gluing the dowel in place.

Finally, I glued the metal squares onto the watercolour paper.


I'm really pleased with this as a way of displaying the squares.

Friday, 2 April 2010

Altered Element April Upcycle pack

Each month Lynne at the Altered Element will be sending something found in a charity shop, and which I will need to recycle into something completely different!

This gorgeous William Morris fabric was in the April pack, along with several toning lace ribbons, ric rac and bias binding.


This Upcycle pack was clearly a sewing project. Only one problem - I don't really think of myself as a textile artist, or even somebody who sews!!!!

Oh, and our house is so upside down because of building work, that I can't get to a table to put the sewing machine on it.
Which is how I discovered that I can use a sewing machine on top of a kitchen worktop, standing on one leg, whilst pressing the sewing machine's pedal with the other...


After considering various options - a book cover, a cushion - I decided to make a shoulder bag. I have a book of bag designs, but they are all so SQUARE! Surely it wouldn't be any more work to make a bag with a different shape? And much more interesting...

I cut a shield shape from some scrap card and used it as a template to cut 8 pieces from the fabric. I cut the remaining long strip into two, and used that to make the straps.

I sewed the ribbons, ric rac and binding onto spare pieces of fabric paper, using embroidery stitches for the pale green ribbon. I made a 'flap' for the bag using more fabric paper and the rest of the ribbon.


I decided the ribbon panels and flap needed a bit of a lift so I covered them all with some sea green/blue organza, and sewed a few silk flowers here and there. I sewed the bag together with the panels, and added a magnetic closure under the flap. There are deep gussets at the sides of the bag, so it can hold quite a lot!


When I started making this, I thought it might make a gift for somebody else. By the time I'd finished, I'd changed my mind and decided to keep it for myself!!! Although I didn't think a patterned bag was my style, I do have a couple of pretty plain turquoise outfits, and this will be a nice bag to use when wearing those...

Thanks again to Lynne for lovely things to play with, and taking me in an unexpected direction!

Altered Element April DT pack

My April DT pack arrived from Lynne at the Altered Element, and when I looked at the contents, I must admit that my first thought was 'What HAVE I done?'

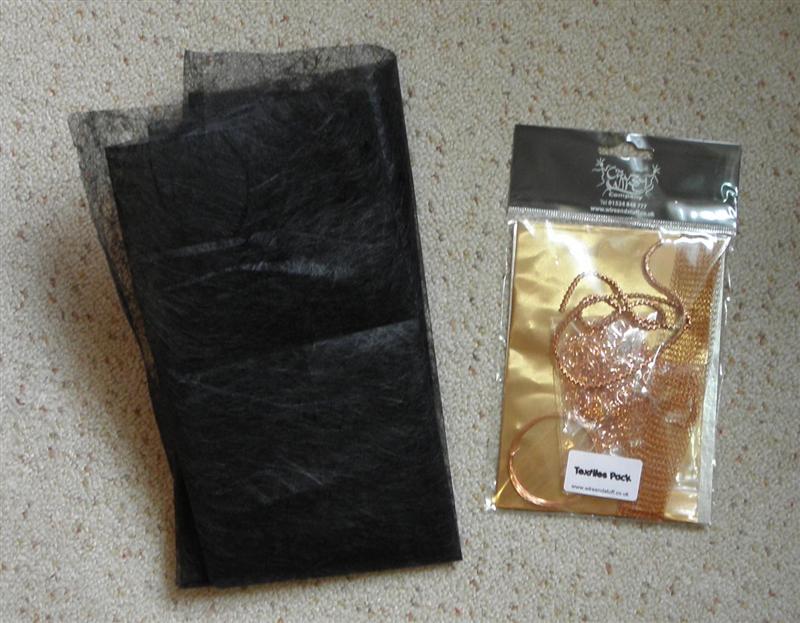
I loved the colour combination, but didn't have much of a clue as to what to do with the contents of the pack! I recognised the black lightweight
Lutradur, and the copper coloured metal and wire, but had no idea what to do with the stretchy twisted wire stuff (bouillon wire), or the curly shredded wire stuff (lametta curls)!


I thought I'd start somewhere in my comfort zone, so I applied some Golden light moulding paste to the Lutradur using a Crafty Notions stencil.


I added copper colour with a Moonshadow Mist Incandescent Copper spray.


I laid the Lutradur onto a spare piece of fabric paper left over from another project. I liked the look, so I sewed them together, then used my heat gun to distress the Lutradur.


I liked the heart shaped leaves in the tree, so I punched some hearts from the metal sheet, and shaped them using a wooden stick sharpened to a point.


I added these to the area below the tree, and sewed some beads around the tree, and the twisted stretchy wire stuff (bouillon wire) onto the tree. I decided that the focal piece needed a background to complement it, which also gave me the opportunity to use some more of the pack contents.

I painted the edges of some thick card with copper acrylic paint, laid some more Lutradur over the copper, added the lametta curls at the corners, and covered the whole with some copper and blue two toned organza. I added a ribbon hanging loop and backed it with velvet paper.


Finally, I glued the focal piece to the background. I never imagined producing anything like this, so am pleased that the contents of the pack took me out of my comfort zone and made me combine metal and textiles.


The pack also contained some gorgeous Cosmic Shimmer thick embossing powder and some knitted wire tubing, but I didn't manage to incorporate those - I'm sure they'll come in handy for another project!

Sunday, 28 March 2010

Altered Element DT pack 1

Each month, I will have 2 'design team' packs from The Altered Element. One will be a pack of things sold in the shop, and the other will be an 'Upcycle' pack consisting of something from a charity shop.Align Centre
This month, the Upcycle pack is a beautiful piece of William Morris 'Agapanthus' fabric in blues, greens and lilac, with some ribbons and lace in toning colours. I'm thinking about the possibilities for this pack, but do have a project in mind.


The pack of stock items consisted of a large piece of black 30g weight Lutradur, and a copper themed pack of metal, bullion wire, knitted wire tubing, fine copper wire, and Lametta curls.

I have started working with the contents of this pack and hope to post a finished project this week. I'm waiting for something to dry at the moment, before carrying on to the next step.


What would you make with this pack?

Sunday, 7 March 2010

Colorwash spray technique

I had a 'light bulb' moment today. I have lots of colourwashes in my stash, and have only ever sprayed them onto various surfaces, or painted them onto specific parts of projects. What was I thinking of? I should have thought of using them like this a long time ago, not finding out by accident today!

I was making something today when I accidentally got some colourwash onto some glossy paper. I dabbed it with a wet wipe. I liked the effect. I added another colour, dabbed, added another colour and dabbed until I was happy with what I had. It looks quite similar to alcohol inks at first glance, but it a much cheaper way of achieving the effect than using alcohol inks. I used what I produced as backgrounds to stamp on, and made these two cards.


Mixed media pendant


I had a few birthday presents to make, and reluctantly decided to use my last few Patera hearts. These are part of a range of really high quality jewellery findings, and the pendants all have matching punches, which makes it really easy to achieve a professional finish when cutting your artwork to fit.

I was only reluctant because I have a weird thing about not using things in my stash which I really like, especially the last of anything (because then I won't have it any more, and who knows whether I can get it again LOL).

I was also reluctant because I can't find a UK supplier for these beautiful high quality jewellery findings, and UK customs restrictions on imported goods means I can only buy 5 at a time from the US, unless I want to pay £8 handling charge plus 17.5% tax.

I took some fabric paper scraps left over form my last mixed media art quilt, and punched it to shape. I stamped with Versamark, and embossed with Stewart Gill Metallic copper embossing powder, then sewed on a bead and bead spacer. Voila! A pretty unique piece of wearable art. Apologies for the image quality, I scanned it and probably should have taken a photograph instead.
Anyway, I hope the friends who receive them for their birthdays like them!

Woo HOO


I used to buy most of my art supplies from the US, because I couldn't find a UK website which sold the eclectic mix of stuff I like to play with, and I was fed up of paying lots of expensive UK postage to buy bits and bobs from lots of websites. Altered Elements sells most of the things I like to use, so I am really happy to have found their website!

However, I'm doubly happy because I'm delighted to announce that I've been chosen to be part of a new Altered element design team. I will be playing with products from Altered Element for the next 6 months, and sharing whatever I create here.

I will also share them on this blog, so watch this space!

Tuesday, 16 February 2010

Beryl Taylor style wall hanging

I've been making a Beryl Taylor style wall hanging this week. I made some fabric paper using paper napkins/serviettes, I think it's the nicest I've ever made, probably because there is less contrast in the images and colours than using random papers.

I took an old cotton pillowcase, and cut it into 4 pieces. I mixed equal amounts of PVA (white) glue and water together in a pot, and used an old paintbrush to paint the glue mix onto the fabric. I laid cut up napkins on top, leaving gaps between the pieces., and painted with more glue mix. A top layer of white tissue with more glue mix finished the structure, and before the glue dried I added a wash of 3 colours of watered down acrylic paint. I left it to dry overnight, and this is the finished product.


I cut a piece about 7 inches by 11 to use for the wall hanging, and started to use some of the rest of the sheet to make embellishments. Here are a couple of small pieces sewn onto felt, trimmed, and with buttons and beads added.


This heart is made the same way - sewn onto felt, trimmed, then embroidered and beaded.


I sewed the background onto a piece of felt, then added some painted diamonds, ribbons and hand dyed lace. I stamped onto the diamonds with gold paint, and sewed around the edges to make them stand out from the background.


I added another ribbon, and sewed square sequins and beads onto it to break the colour up. I sewed some of my little beaded and buttoned embellishment pieces on, and thought about what to put in the big space!


When I'd made some more embellishments, including one made from Paper Perfect, and sewn them on along with some silk flowers, the quilt was almost finished, but the vertical stripe of turquoise ribbon was too strong, so I broke it up by applying moulding paste through a heart stencil at regular intervals down the ribbon. Once dry, I finished them with Treasure Gold rub on wax. To finish the hanging off, I sewed deep pink organza ribbon around the edges, and backed the fabric with some mount board. The finished hanging looks like this:


This quilt took about 20 hours to make, but I enjoyed making it, and hope the long standing swapping friend who receives it like it too.

Sunday, 14 February 2010

Ribbon storage

I have tried all sorts of ways to store ribbon, and have always ended up with several problems - I can't see what ribbons I have, or how much I have of each ribbon, and despite my efforts to wind it onto various things, I usually end up with a tangled mess in a box.

And then I found this:

http://www.ribbonring.com/

and I thought it was too expensive, so I bought some plastic ribbon storage cards which did stop my ribbons getting into a tangled mess, but still stopped me seeing how much of any ribbon I actually have. And all the ribbons on the cards were still in a box, so I couldn't see at a glance whether I had anything which would go with whatever I was working on. I certainly couldn't just lay some ribbon onto a project to see how it looked - I had to delve into the box, unwrap ribbon form the cards, try it and re-wrap if it didn't suit.

So, I decided to try the ribbonring system. I am a complete convert. I don't usually promote products here, but this has made my life so easy I thought I'd share it with you all! All my ribbons are now stored on the system, and hang from a coat hook on the door in my craft room. I can see what i have at a glance, and there are no tangles. Bliss!!!!

ATCs


Here are a few of the ATCs I've made recently. I love the small scale of ATCs as a 'canvas' to try out new ideas, techniques, and products, before using them in bigger projects where mistakes would be more costly in terms of time and materials.

The pear on this ATC is made from polymer clay, painted with acrylic paints and stamped onto. It's set onto textured card, which I painted with fluid acrylics then rubbed with metallic rub on wax to bring out the texture.


This ATC was a way of testing out Brilliance white ink on colourwash & distress ink backgrounds. I used watercolour paper which had been sprayed with several colourwash sprays, then stamped the main image using black Stazon. I used a mask to cover the centre of the image, and added distress inks around the edges using cut and stamp foam. Finally, I stamped using Brilliance Moonlight White.


This was another new technique try out. I created 'luminous paste' by mixing PearlEx with glossy soft gel medium (one of the variations in Julia Andrus's Paper Transformed book), and applied it to painted canvas through a stencil. The letters are die cut. The butterfly is polymer clay - using clay which was rolled out, had a layer of metal leaf added, coloured with alcohol ink, then rolled out thinly so that the metal leaf 'cracks'. I had leftovers from my mian project so put them into the small buttefly mould to see how they looked. Works for me! I'm not sure I like my design here, but it is a little record of the techniques I used, which will act as a reminder for me.


Fabric paper jewellery

One of my friends has a birthday this week, so I thought I'd make her a little something!

I used an antique copper heart pendant finding from Nunn Designs - I love their findings, they are well made and gorgeous. And several of the pendant bases have punches in exactly the same size and shape, which takes all the hassle out of cutting your artwork to fit!


I used a scrap of fabric paper, punched it to shape, laid it onto a piece of felt and sewed around the edges, and trimmed the felt. I beaded the surface, then stuck it into the heart bezel with heavy gel medium. I hope the recipient likes it!


Recycling

I made a votive for a friend, using an old translucent cosmetic pot. This is a really easy project, and looks pretty! Stamp your design onto pastel coloured tissue paper, adhere to pot using gel medium, add a circle of velvet paper underneath to cover the scruffy tissue edges.

Cut decorative canvas scrap to size to fit neck edge (this covers the screwtop ridges) and adhere using gel medium. Add a trim of gold german scrap to the inside and outside rim, and it's done!

Sunday, 31 January 2010

Friendly plastic butterfly

I made a friendly plastic butterfly for the Amaco butterfly competition - all the entries will go to the holocaust museum, each to represent a child who died. I had decided not to enter the competition, as I was very busy at the time, plus international postage is expensive. But somebody from Amaco emailed me and asked if I would submit an entry, which was flattering...

I made this in a bit of a hurry, and it's not as good as I would have liked, but I didn't have time to re-do it, so off it went! It was on display on the Amaco stand at CHA 2010!


The butterfly is about 4 inches across, and I used a colouring technique I learnt from Liz Welch - doodled alcohol ink. I didn't have time to take step by step pics when I was making the butterfly, but have included some from an earlier project (below) so that you can see how easy it is to do. To make the butterfly, I used 2 wing shapes cut from doodled sticks and a body made from a piece cut from a
fuschia stick. I joined them all together by dipping the edges into hot water for a few moments then pressing them together and holding in position for a few moments. The antennae were made from copper wire.


To make doodled alcohol ink Friendly Plastic, take a stick of gold Friendly Plastic and drip some alcohol ink on it. The newer bright colours are good for this technique. You can blow the ink around using a straw if you like.

Keep adding aclohol ink. If you're blowing it with a straw, you will find that the ink you're blowing comes to a sudden stop when it touches dry ink. So, eventually you will have to drip or dab the ink into the gaps.

This is what the finished piece looks like, along with the inks I used.

Now take a white Sakura souffle pen, and draw around the blobs using wriggly lines, then infill with doodles, until the piece is doodled all over.


Easy to do, and looks very effective. Liz uses it to make beautiful pendants, by cutting it to shape and size and laying it into bezels, then covering with layers of resin and trapping doodles or tiny embellishments between the layers.

Thursday, 7 January 2010

Conditioning Polymer Clay

This is a first - a blog post without pictures! I have been playing with polymer clay, but not nearly as much as I'd like to, and I haven't finished anything off to a standard that I'm happy to show off yet!

The problem with polymer clay is that you have to condition it before you can play with it. Clay is properly conditioned when you can fold a thin sheet in half and have no cracking at the fold.

Different brands of polymer clay have different properties, and as I have learnt this week, until you understand what they are, you won't necessarily be successful in preparing the clay for play.

I worked with Fimo Classic last summer, and found it a bit of a pain to condition, even using a pasta machine, so a friend suggested I try Fimo Soft. Fimo Soft is easier to condition, but I don't like the look or feel of the baked clay as much as baked Classic.

I worked with Sculpey's new lightweight Polymer Clay - it is a dream to condition as it is very soft and easy to knead. It also takes colour very well after baking - using alcohol inks and Johnson's Klear/Future acrylic floor polish. If I had found this first, I probably wouldn't have tried any other polymer clays! Except that I like to use black clay, and I haven't seen this product in any colour other than white - it may exist, but I haven't seen it.

I had read that Kato Clay is harder to condition, but worth the extra effort in terms of the finished product. I have tried it this week, and would agree completely that the finished product is the best I've tried, but the conditioning nearly defeated me.

I asked around for suggestions about conditioning polymer clay. Friends suggested that I place the pack of clay in my underwear or that I sit on the package for a while to warm it up before trying to condition it in a pasta machine. I have discovered that this works well - but only for some clays.

Fimo clay is conditioned by the use of gentle warmth and kneading, or running the slightly warmed clay through a pasta machine. So the underwear or sitting on it technique works well.

Kato Clay is conditioned by pressure, so warmth doesn't help at all. And even in thin slices, running it through my pasta machine just resulted in a load of crumbs which I couldn't get to stick together enough to run through the machine again, and which were too hard to knead. I spent an evening trying to get crumbs through the machine in enough quantity to stick together. It was really hard to get through the machine, and I had to run it through between 35 and 4o times to get it manageable, but it still wasn't properly conditioned. I gave up and left it alone for a couple of days.

And then I had a brainwave. I remembered reading that you can use your Wizard to condition polymer clay, so ran some clay through it, between plastic bags. The clay got softer, but the bags stretched and popped. I ran some more through between pieces of teflon craft sheet. The clay got softer, but I managed to split the craft sheet! After running the clay through the Wizard about 10 times it seemed much softer, but also seemed to be getting 'dry', so I moved it to the pasta machine and ran it through a few times. It was really easy to run through the pasta machine, and working it between metal seemed to make it less dry and more plastic and elastic.

So, I now have my perfect method for conditioning KatoClay - run small amounts through the Wizard ten times, then through the pasta machine 10 times. Combine the resulting small sheets into bigger sheets, until all the clay you want to work with is in one sheet, and can be folded without any cracking at the fold. This method is much easier than the pasta machine alone, and certainly much much quicker.

I need to experiment with what I use to protect the Wizard plates whilst running the polyclay through the Wizard - polythene is too stretchy, teflon craft sheet is not stretchy enough, and probably too thin. Ideally, 2 thin metal plates would be best, but until I can think of how to create those (cutting up the Christmas 'Quality Street' tins?), I will try using the thin plastic used for slot-together files & boxes, or acetate from Christmas Card packaging, or transparencies. I'll edit this post and let you know what works best when I have tried a few things out!

Guestbook

Copyright

Please note that I assert myself as the creator of all art on this site (unless I credit another artist) and retain copyright of all artwork posted on this site