Sunday 23 September 2007

Altered Art????

At the end of our last holiday, we wasted a lot of time
at the airport looking for our suitcase because
somebody else picked it up up by mistake.

We finally caught up with them at the bus stop outside
(purely by chance) and exchanged bags.

I always put my name and address inside my suitcase,
so we would probably have got it back in the end,
but I don't need this sort of hassle!

I wanted to be sure I would be able to
spot my suitcase on an airport carousel.

It was a sort of plain silver colour.

Now it is themed with the season!


I'm not sure it's finished, but I like it better already!

And I certainly won't confuse it with anybody else's suitcase.

Just hope nobody else likes it enough to steal it...


Saturday 22 September 2007

Art & Soul Necklaces

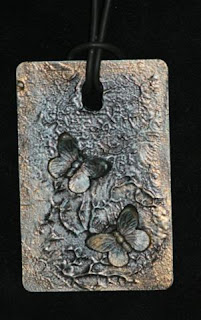
I am travelling from Wales to Portland next weekend - as I am attending my very first 'Art & Soul' retreat. This is a week of luxury in a hotel (no cooking, no washing up, no food shopping, no worrying about what other people want or need), just playing with arty stuff and learning new techniques, playing with new materials, and meeting like minded people - my idea of BLISS!!!!

Part of the event is trading pieces of your art with others. I have made about 50 necklaces from laminate samples, some of which I have uploaded here. I have also made quite a few ATCs to trade. I will be taking lots of pictures of my time in Portland, and also of the time I spend with friends in Wisconsin (the second part of my trip) and I am sure some of them will eventually find their way onto my blog, so keep your eyes peeled!


Sunday 9 September 2007

New background idea


I needed a raspberry-related background
(don't ask, LOL)
and also wanted depth and glossiness,
so decided to play with some of my supplies
and some kitchen foil.

Of course, the scan doesn't show the glass-like appearance,
or the depth of colour,
so you will just have to imagine those elements!

To make something similar to the above background,
take some good quality kitchen foil and crumple it up,
then spread it back out without flattening it too much.

Paint it thinly with 3 or 4 acrylic paints - you can
allow to dry between layers or just slap it on,
but paint thinly, and don't cover the raised parts with paint.
I used Stewart Gill paints.

Add a layer of Opals heavy embossing powder -
Franklin, and before it sets sprinkle some texturising elements
on - I used Stewart Gill Byzantia Gilding Chips & Bijou Blends
and also some Glitterati fibres then added another coat of
Opals Franklin. It was looking pretty good at this point,
but didn't have enough 'depth' or zing.

So I added some more colour by applying
Ranger alcohol inks in Wild Plum, Cranberry & Raisin.

Perhaps if I try this again (and I think I will!)
I won't use paints as the base layer,
but will use alcohol inks direct to the foil
and see how much depth of colour I have.

I haven't tried cutting this into pieces yet,
but if it cracks when I do, I am sure a quick
blast of the heat gun will mend it!


Saturday 8 September 2007

Wedding cakes


My last post reminded me that I sometimes make wedding cakes.


So, I thought I would share a few photos of wedding cakes I have made.

The cake above was for a good friend of my brother's,
and if you look carefully, you can see some of
that 'Rosetti work' I have used on my doodle ATC!

The flowers are all made of sugar paste.


This cake was done to specific instructions,
for my eldest step daughter
(I think she thought I wouldn't like it).

I thought it was the coolest cake I have ever done.

(And the easiest!)


It was a humid day in July,
and the 'spikes' had 'relaxed' somewhat
by the time the cake was cut
(about 2 hours after assembling it)
but I think I liked the 'relaxed' version even more!

There were 5 layers, some madeira sponge cake,
some chocolate cake and the bottom layer was rich fruit cake.
Yummy! I like my cakes to taste even better than they look..


The cake above was done last summer,
for a friend, again to specific instructions!

Flowers and leaves all made from sugar paste

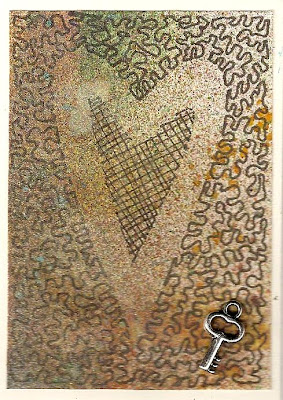
Doodling


Doodled all over this ATC for a swap on
CC Swaps - it was quite fun - I used to
do this kind of wiggly doodling
(called rosetti work) with an
icing bag and tube,
all over cakes,
to give texture!

The background is the paper that lined
my 'spraying box' and caught all the overspill
from any Radiant Rain, Color Mists,
Sticky Fingers colourwashes
or other sprays. It looks so pretty
that I have lined the box with new paper,
and cut this up to use as backgrounds!

Tuesday 4 September 2007

Round Robin Board Book


This is a page I have just completed in a 'round robin' board book.

The theme was 'journey' - other contributors had
completed pages on spiritual journeys,
journeys across oceans,
journeys through time,
journeys to particular memorable places,
and the journey within,
but I chose to illustrate the journey of life,
and took Shakespeare's 'Journey of Man'
(from As You Like It) as my starting point.

I used photo transfers onto canvas for the images,
and although I like my doodles :-)
and the background
(torn pages from a thesaurus,
coated with Gesso & Nick Bantock inks),
I am not thrilled with the composition of the page.

It was, however, the only way I could find to
get all the components I wanted to add onto the page...

...and I hope Maggi likes it.

Monday 3 September 2007

A belated chunky page


Here is a chunky page I made back in April.

I have not been able to post pictures until now because
this was part of a surprise chunky book,
which was presented to the recipient yesterday.

(front of page - closed)


The book was thought up by Debra Cochran,
as a way of saying a special thankyou to
Kathy 'Sweetpea' Beringer, who had done a
fantastic job of hosting a number of chunky books
on CC Swaps group.


(front of page - open)


68 people each made one page for this book -
which had to have a crown shape at the top -
and each and every one of them made an
extra effort to make their page special.

I added an Art quote to the front of my page because
I know Sweetpea likes art quotes,
and a fish because I know she likes fishing!

My page is made from mirror card with
texture added by using a rough embossing powder
(Marcasite by Stewart Gill) then coloured with Steam & Rust
alcohol inks. The front 'flap' is made from fun foam,
heated and stamped into, then painted with
Stewart Gill paints and finished with wax rub ons.

The fish was stamped onto a piece of 'caught in crystal'
and mounted onto a piece of background made by using
Posh Inks on glossy card, layered with some textured paper.


(back of page)

On the backs of our pages, we each wrote a little about
why we appreciate Sweetpea,
and included a photo of ourselves on the page
so that she can put a face to our names.

I understand Sweetpea quite liked the book :-)

Sunday 2 September 2007

Another Geodeco Thingie


Zeborah has a lot to answer for - these things are addictive!


I wondered about adding metallic elements
to the basic Geodeco Thingie
or even making one out of metal -
but contented myself with using
some patinated cardstock, metal tape,
alcohol inks and copper embossing powder
and wire to add metallic elements.

I am half way through another similar
(but improved) version with more
texture - watch this space!

For more information about Geodeco Thingies:

http://www.amstamps.com/geotut/


Saturday 1 September 2007

Metal ATCs


More ATCs for a swap - I am on a metal kick
at the moment - these are done with sticky backed
metal repair tape (bought in the hardware or DIY store).

As the tape isn't wide enough to cover an ATC,
I cut the tape up into small pieces and stick them
down on the cardstock, then go round the edges
making dents with an embossing tool.

A quick dab with alcohol inks,
and voila! a lovely background

I've done this before for altered book pages,
but today I had one of those 'light bulb' moments!

Why not stamp on the metal tape?
I found that Stazon worked well,
then I stuck my stamped images
onto some cardstock, cut them out
and mounted them onto the ATCs

Because the metal is very thin,
it is easy to make marks on,
so if you need letters or words,
just draw them onto the tape,
cut them out, and stick them down!


Guestbook

Copyright

Please note that I assert myself as the creator of all art on this site (unless I credit another artist) and retain copyright of all artwork posted on this site