Showing posts with label metal. Show all posts

Sunday, 4 April 2010

Metal squares 'screen'

I was in a metal squares swap on UKArtSwaps yahoo group, where we swapped 2 inch metal squares, and part of the swap was that we also had to create an item on which to display our squares.

I decided to create a Beryl Taylor style accordion screen. Beryl's original screen was white, and was the subject of an article in issue 10 or 11 of Cloth Paper Scissors.


I decided that the colours of the metal squares would be best complemented with shades of violet and turquoise. I made a sheet of fabric paper by gluing paper napkins onto an old pillowcase, covering with tissue paper, and painting with watered down Golden fluid acrylic paints before the glue dried. I cut the fabric paper into 12 oblongs, and sewed buttons onto 6 of them, before backing them with felt.

I tore some hot press watercolour paper into oblongs, before colouring it with watered down colourwashes. I sewed these onto the fabric paper backed with felt.

I made some 'joints' by dyeing and sewing some of the pillowcase into 'sleeves' for the wood dowel. I coloured the dowels with Adirondack colourwash in Stream. I glued the 'sleeves' to the back of the felt, and backed with the fabric paper, before gluing the dowel in place.

Finally, I glued the metal squares onto the watercolour paper.


I'm really pleased with this as a way of displaying the squares.

Friday, 2 April 2010

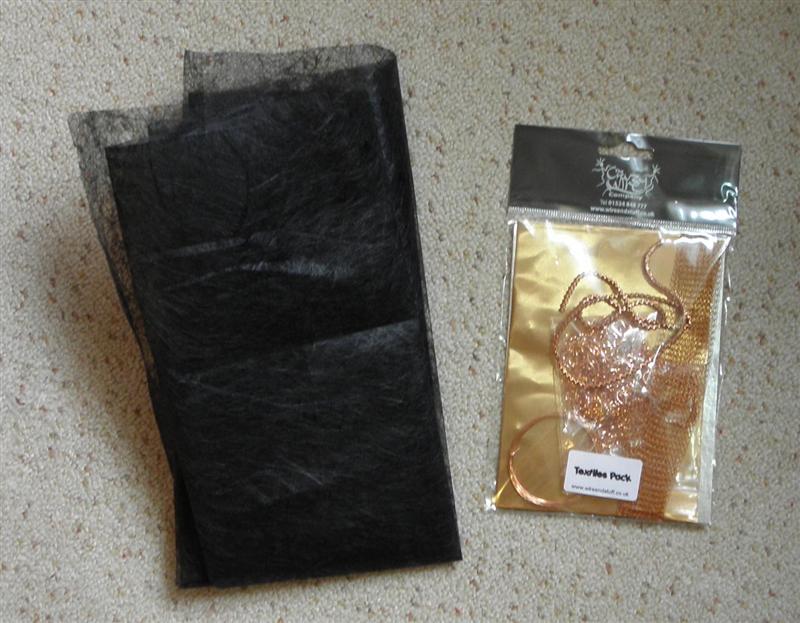
Altered Element April DT pack

My April DT pack arrived from Lynne at the Altered Element, and when I looked at the contents, I must admit that my first thought was 'What HAVE I done?'

I loved the colour combination, but didn't have much of a clue as to what to do with the contents of the pack! I recognised the black lightweight
Lutradur, and the copper coloured metal and wire, but had no idea what to do with the stretchy twisted wire stuff (bouillon wire), or the curly shredded wire stuff (lametta curls)!


I thought I'd start somewhere in my comfort zone, so I applied some Golden light moulding paste to the Lutradur using a Crafty Notions stencil.


I added copper colour with a Moonshadow Mist Incandescent Copper spray.


I laid the Lutradur onto a spare piece of fabric paper left over from another project. I liked the look, so I sewed them together, then used my heat gun to distress the Lutradur.


I liked the heart shaped leaves in the tree, so I punched some hearts from the metal sheet, and shaped them using a wooden stick sharpened to a point.


I added these to the area below the tree, and sewed some beads around the tree, and the twisted stretchy wire stuff (bouillon wire) onto the tree. I decided that the focal piece needed a background to complement it, which also gave me the opportunity to use some more of the pack contents.

I painted the edges of some thick card with copper acrylic paint, laid some more Lutradur over the copper, added the lametta curls at the corners, and covered the whole with some copper and blue two toned organza. I added a ribbon hanging loop and backed it with velvet paper.


Finally, I glued the focal piece to the background. I never imagined producing anything like this, so am pleased that the contents of the pack took me out of my comfort zone and made me combine metal and textiles.


The pack also contained some gorgeous Cosmic Shimmer thick embossing powder and some knitted wire tubing, but I didn't manage to incorporate those - I'm sure they'll come in handy for another project!

Monday, 9 November 2009

More beading


If you are in a Christmas present swap with me, and like surprises, you may not want to read this blog post..... don't panic, the pictures are a long way down...

I have been cutting & beating metal, which I find particularly satisfying for some reason....

Here's a photo of me (very rare!) bashing some metal:


And once the metal is cut, filed, beaten, punched and riveted, it needs embellishing...

In this post there are some pictures of the Beads on Metal pieces I have made recently. Each uses a different Beverly Gilbert bead soup mix . Beverly taught me how to make these Beads on Metal pieces, and I love the technique, but also know that Beverly's bead soups are really so luscious that the they make these pieces extra special. Beverly also has a new book out, 'Beaded Colorways', published by North Light Books, and I am tapping my fingers and toes waiting for my copy to arrive, as she tells me she has shared all her secrets inside!!!

Anyway, back to the artwork - and I have been testing my new camera taking these pictures, which are nowhere near perfect - I'm getting about a 50% success rate on the close up shots (old camera was about 30% success) but really need to keep a photo notebook so that I can remember which settings I took particular shots in, and in what order! It's hard photographing all those shiny bead and metal surfaces, particularly if the camera wants to focus on a different part of the image than I do....

In this pic, the camera really liked the bottom right hand corner - I knew it wanted to focus there but didn't know how to change it's mind LOL. I wanted it to focus on that big bead, which is where I was aiming at through the viewfinder...


In this pic, it focused where I wanted it to, but not quite as well as I wanted it to, and there really aren't and pink beads in the piece - they are a lovely purply wine colour...


This is better, but could be sharper...


I didn't light this one well enough - think daylight works better!


This is probably the nicest piece, I should have taken the picture from a different angle to show off the big beads!


I tried a minimalist style here, as far as the beads are concerned, and a wriggly hammered wire piece rather than a hole and jump ring, and I quite like it!


Still quite minimalist, but with a few more beads.


This one looks stunning in real life, I haven't caught the colours at all well.


I am making 15 pendants in total, so will post pics of the others when I have finished.

Sunday, 11 October 2009

More beads on metal

I am halfway through making a pendant and earrings to match the bracelet I made. I probably won't be able to finish these for a few weeks, but will try to remember to post a picture of the whole set when they are done.


Beverly Gilbert is such a good teacher, and a wonderful hostess. I have had a great few days learning more about beading and metalwork. I highly recommend taking a class with her if you are able to!!!

Thursday, 8 October 2009

Beads on Metal bracelet


I took a class with Beverly Gilbert yesterday. If you ever get the chance to do this - grab it with both hands! Beverly is a fantastic teacher, has a wonderful eye for colour, and makes gorgeous samples. We were very lucky to take the class at Beverly's home, and were also provided with a wonderful lunch, plus teas, coffees, seriously good chocolate, salted almonds and olives a part of the day.

I decided to make a bracelet. This meant cutting ten pieces of copper, filing the edges of each, hammering the edges of each, and hammering five of them to give surface texture. Below you can see one of Beverly's finished bracelets, with the beginnings of my bracelet.


The next step was to create 'anchors' for the beadwork, by punching holes in the smaller 'front' metal pieces, and threading wire through the holes. I stamped words onto the back pieces, using metal punches.

Finally, I created some rivets from copper wire, and joined the pieces together, then 'antiqued' them by bathing them in liver of sulphur. Once the metal was dry, I beaded on top, you can see several stages below.


Once all the beading was done, I joined the links together with hand made jump rings, and made a clasp and link.


A closer view on my wrist:


And then I turned the bracelet over. Spot the deliberate mistake!!!


I will be taking the links apart and turning some around sometime soon!

Saturday, 5 September 2009

Etching metal

I've been etching some metal blanks. I learned to do this in a class I took with Jane Wynn in the US in October 2007, and it is really easy to do, but I didn't find the supplies here in the UK until recently. All you need is metal blanks or charms - brass or copper, some PCB (printed circuit board) etching solution, also known as ferric chloride solution, some Stazon ink, a rubber stamp, a heat gun, some Bicarbonate of Soda/Baking Soda and a small shallow flat bottomed glass or plastic dish. Oh, and tweezers and a bowl of water. And maybe some patina solution, or acrylic paint in a darkish turquoise.

I bought some metal blanks from Fred Aldous, but Beaducation sell them in the US. I prefer the look of etched brass, but could only find copper blanks here in the UK. There are bound to be other places that sell these in both countries, but those are the places I found. You could of course cut your own shapes from sheet metal, you need 18 gauge if possible.

Once you have your metal blanks or shapes, stamp your design on them with Stazon, and heat set. You can stamp on one side, or both. If you only stamp on one side, coat the other side with Stazon, or some sticky tape. This is what my metal blanks looked like after stamping:


Pour about 1/4 inch of the PCB etching solution into your dish, and drop the metal in. Swish it around a little, then leave it in there for ages, checking every couple of hours. It could take anywhere between 2 and 8 hours for you to get the depth of etching you want. I usually find 4 hours is enough. Agitation helps, so give it a swish around every time you pass by. The Stazon acts as a resist, the etching fluid only attacke the areas which aren't stamped. This is what my metal blanks looked like after 4 hours:


When you think they are done, use the tweezers to remove the metal from the etching solution. Dry them on some kitchen towel, then drop in water. Make sure you rinse thoroughly, also rinse your tweezers. Dump a couple of teaspoons of baking soda into the etching solution in your container. It will bubble up and froth, but this neutralises the etching solution to a great extent. Wait till it's done, then scrape the mess onto an old newspaper, wrap and put in the bin. Don't dump it down a drain, it's poisinous. It's worth checking if your local council has specialist disposal solutions for ferric chloride.

Rinse your container out with plenty of water. Now, you can coat your etched metal in patina solution, and leave it to patinate and dry overnight, or if you are impatient, like me, you can give them a thin coat of deep turquoise acrylic paint, wait for it to dry, and then use a sanding block to remove the Stazon, showing the shiny metal. The acrylic paint will have coloured the etched metal, looking like patina. See below, don't forget that you can click on the images to enlarge them.


It took all day to make these, but the actual time you spend actually doing anything is about 5 minutes!

Here's another picture which shows some of the stages -
the charm on the left is etched and sanded but not patinated. The second from left is etched and patinated with Modern Options patina solution, then sanded. The third from the left shows what happens if you stamp and etch both sides of the metal and leave it in the etching solution too long! The one at the right is just as it came out of the etching solution - I haven't coloured the etched metal or sanded the Stazon off yet.


Saturday, 27 September 2008

Stamp versatility swap

The idea of this swap was to explore how the same stamp can be used to create different 'looks'. We each had to create 3 cards or ATCs using the same stamp in different ways. here's my take on it, using a stamp by Invoke Arts:

Background - Reynolds freezer paper used in a 'spray box', which has accumulated overspray from previous projects on non-plasticised side. Adhere to cardstock using gel medium.


Embellishment - heat fun foam with a heat gun until it begins to curl, stamp into fun foam and hold the stamp down as hard as you can for about a minute, until the foam cools. Remove stamp, cut around image. Paint the fun foam with 2 coats of a paint intended for fabrics - I used Stewart Gill, but Lumieres would be fine. Once dry, gently rub some Rub'n'Buff or Treasure Gold over the raised areas to highlight them. Adhere to the background using glue dots.


Background - cover cardstock with small pieces of metal tape, burnish, then use a Ten Seconds Studio metal roller tool to add texture. Rub with Rub'n'Buff or Treasure Gold to dirty it up a bit, then add colour with a Brilliance Inkpad.

Embellishement - fold a piece of Fantasy Film (ART Glitter Institute) or Glitterati (Stewart Gill) in half and put into a hot laminating pouch. Laminate, then stamp image using Stazon ink. Cut around image once ink is dry, and adhere to background with gel medium. The scan doesn't show the iridescence that is visible in real life.


Background - coat the card with Golden Iridescent Copper paint. make fabric paper - lay a thin cotton fabric (muslin in the US, 'lawn' in the UK) onto a plastic sheet, coat with diluted PVA glue - the cheaper the glue, the better. Add pieces of thin gift wrapping paper, leaving gaps between, coat with more diluted glue, add a sheet of white tissue paper, smooth down, add more diluted glue, and while the glue is still wet, add very diluted Golden fluid acrylic paints (other acrylics will also work, but diluting them until they are the thickness of ink may render some cheaper paints fairly colourless as they don't have enough pigment). leave overnight to dry. Overstamp with Brilliance ink - I used Cosmic Copper and a Stamp Camp stamp. Glue to felt using PVA glue, cut to size, adhere to cardstock and edge with 3 dimensional paint, which gives a 'faux solder' effect.

Embellishment - lightly colour some translucent shrink plastic with pigment ink, stamp image using Brilliance ink - I used Pearlescent Olive. Leave overnight to dry. Cut around image, shrink with heat gun, adhere to fabric paper with glue dot. Take a small metal tile, colour with alcohol inks, edge with copper tape, stamp part of image with Stazon, adhere to fabric paper with glue dot.

I had lots of fun experimenting, playing with techniques old and new, and combining techniques. I hope the recipient likes the results!

Tuesday, 16 September 2008

Canvas with metal

Another birthday or two, another canvas or two! I made 2 similar canvases for friends with birthdays. I painted the canvases purple because one of them loves purple, then stamped a swirly flourish with Victorian Violet Brilliance ink. I made the heart embellishment by cutting up an aluminium can, then running it through the Wizard with a small Cuttlebug heart die. It left a deep mark in the cutting mat... I ran it thought the Wizard again in the little embossing folder, to emboss it, and gave it a coat of Ranger alcohol inks - Eggplant, Currant and Wild Plum.


Finally, I adhered the heart and buttons using sticky dots. I hope both friends like their presents!

Thursday, 17 January 2008

Charming

I am involved in a charm swap - I have never
made a charm before, and this is what I came up with.

These are washers from the hardware store,
painted with acrylic medium, then red acrylic ink.
I created some loops from fine
brass wire (off a rioja bottle!),
then added punched hearts,
and gave the charms a couple of layers
of Opals Franklin, which holds it all together,
seals it and gives it a nice shine!

Sunday, 28 October 2007

Beverly Gilbert classes at Art & Soul

It was with a little trepidation that I went to Beverly's Beads on metal class. I had seen her absolutely fabulous work on her website - http://www.gilbertdesigns.net/ - and I had never strung a bead!!! As it turned out, I needn't have worried at all - Beverly is a fantastic teacher, and I enjoyed the learning!

The class was divided into 2 distinct parts - working with metal, and working with beads. Beverly took us through cutting metal, making holes in metal, stamping metal, & cold metal fixings (rivets! & jump rings). Beverly also checked what we had learnt at various points. Here is the back of the piece I made - a bit messy, but not bad for a first attempt!


In the afternoon, we moved on to the beading part of the class - and the beading was freeform, but with some rules to start off with, in order to 'anchor' the bead embellishment to the metal base. Beverly supplied the beads to those who wanted them - she makes 'bead soup', drawing from 40 or more tubes - and the soup is gorgeous. Beverly offers various different colourways for her bead soups, and the one I used on this piece is called 'tropical surf' - yum!!! I am really pleased with the finished piece, and it has been commented on by lots of people in lifts, airports, shops etc over the last few weeks.


I also took Beverly's 'Beachcomber' class - where we wrapped a beach-related object in a 'bead net' in order to turn it into a pendant. I chose to wrap a large shell. The bead kit is called 'antique copper'. This was much trickier to start with, as we had to work on the piece loosely, and gradually increase the number of 'lines' around the shell to encase it securely. I guess this took me about 2 hours:


and I enjoyed the process so much I began another! I must add a couple more strands and a hanging loop....

Saturday, 27 October 2007

'Surfacing' with Jane Wynn

'Surfacing' with Jane Wynn - this was a metalwork/ jewellry class, where we learnt how to patinate and etch metal, and also how to solder bezels onto metal using a blowtorch, and drill holes in metal. Jane's necklaces & pendants are inspirational, she was a good teacher and we all enjoyed a great class. I even enjoyed the blowtorch, but wonder if i will ever be able to drill a hole in metal with a Dremel without skeetering off the edge of the metal or spinning the piece around on the drill bit! Here is the half finished necklace I made in class:


Jane has a new book out: http://www.wynnstudio.com/index2.html which details the techniques she taught in class. I would recommend it highly!

Sunday, 2 September 2007

Another Geodeco Thingie


Zeborah has a lot to answer for - these things are addictive!


I wondered about adding metallic elements
to the basic Geodeco Thingie
or even making one out of metal -
but contented myself with using
some patinated cardstock, metal tape,
alcohol inks and copper embossing powder
and wire to add metallic elements.

I am half way through another similar
(but improved) version with more
texture - watch this space!

For more information about Geodeco Thingies:

http://www.amstamps.com/geotut/


Sunday, 19 August 2007

Geodeco Thingies


Above - gold & black Geodeco Thingie with hot glue heart


Zeborah came up with the idea for Geodeco Thingies,
and has put a tutorial on the
After Midnight Art Stamps website:

http://www.amstamps.com/geotut/

I have been meaning to make one for a while,
but always seemed to have other things to do,
so I decided to motivate myself by running
a Geodeco Thingies swap on CC Swaps:

http://groups.yahoo.com/group/CCSwaps/


Below - black & blue Geodeco thingie
with air dry clay swirl
(made in a Krafty Lady mould)
and blue star gems

Guestbook

Copyright

Please note that I assert myself as the creator of all art on this site (unless I credit another artist) and retain copyright of all artwork posted on this site