Sunday 30 December 2012

Alphabetica Y - layered paint tutorial

About 5 years ago I took a class 
with Ann Baldwin at Art & Soul, in Portland. Ann has been moving from painting to photography, and her photography is interesting but I prefer her paintings. Perhaps when she's been doing photography for as long as she's been painting, I'll like the photography as much as I like the painting!

Ann paints beautiful paintings by layering acrylics - sometimes 45 or more layers. She adds texture by adding papers and other media and textured elements between the layers. I decided on a simple version of what I learnt for Y.

I took some scrap cardboard, and painted in with a thin layer of gesso. 


I gave it a second thin coat.


I got out some gloss gel medium, and a palette knife


Once I'd coated the card with gel medium, I added texture with cookie cutters, a rubber stamp, the wrong end of a pencil and a mini mister cap.


I let it dry.  You can only tell if it's dry by touching it.


I got my paints out - these, and every yellow I have. I love these paints, the colour is still strong, even when thinned with water, or applied in thin layers.


Using my brightest yellow, I painted the hearts. This may look a bit like fried eggs at the moment but it will improve, honest!


I gave it a coat of Nickel Azo Yellow. Transparent colours are best for this technique, but you apply the paint so thinly that you can get away with less a transparent layer every now and then.


I gave it a coat of Transparent Yellow Iron Oxide..


I took my paintbrush and went around the hearts with a thin layer of Yellow Ochre. This was still a very thin layer of paint, but I added some uneven-ness by painting some areas more than once.


I added a touch of red for contrast - I made a mask then stamped each heart with a dotty stamp and red Stazon.


Doesn't look like fried eggs any more, I'm starting to like it now.


Next, I stamped some words over the spots - big improvement - and then painted some of the circles with Iridescent Bronze. This is very bright, but it will mellow when there are some layers of transparent paint on top.


I added a layer of Nickel Azo Yellow. See how those bronze circles have warmed up?


Another layer of Nickel Azo Yellow. I like this - it could get much richer with more layers and the introduction of other colours, but this peice has to be Y for Yellow, so I'd better stop. There are about 10 layers of paint here.


The back, though, well that's another matter.  I'd done everything so far (apart from the red spots)  to another piece of card to be the back of the piece.

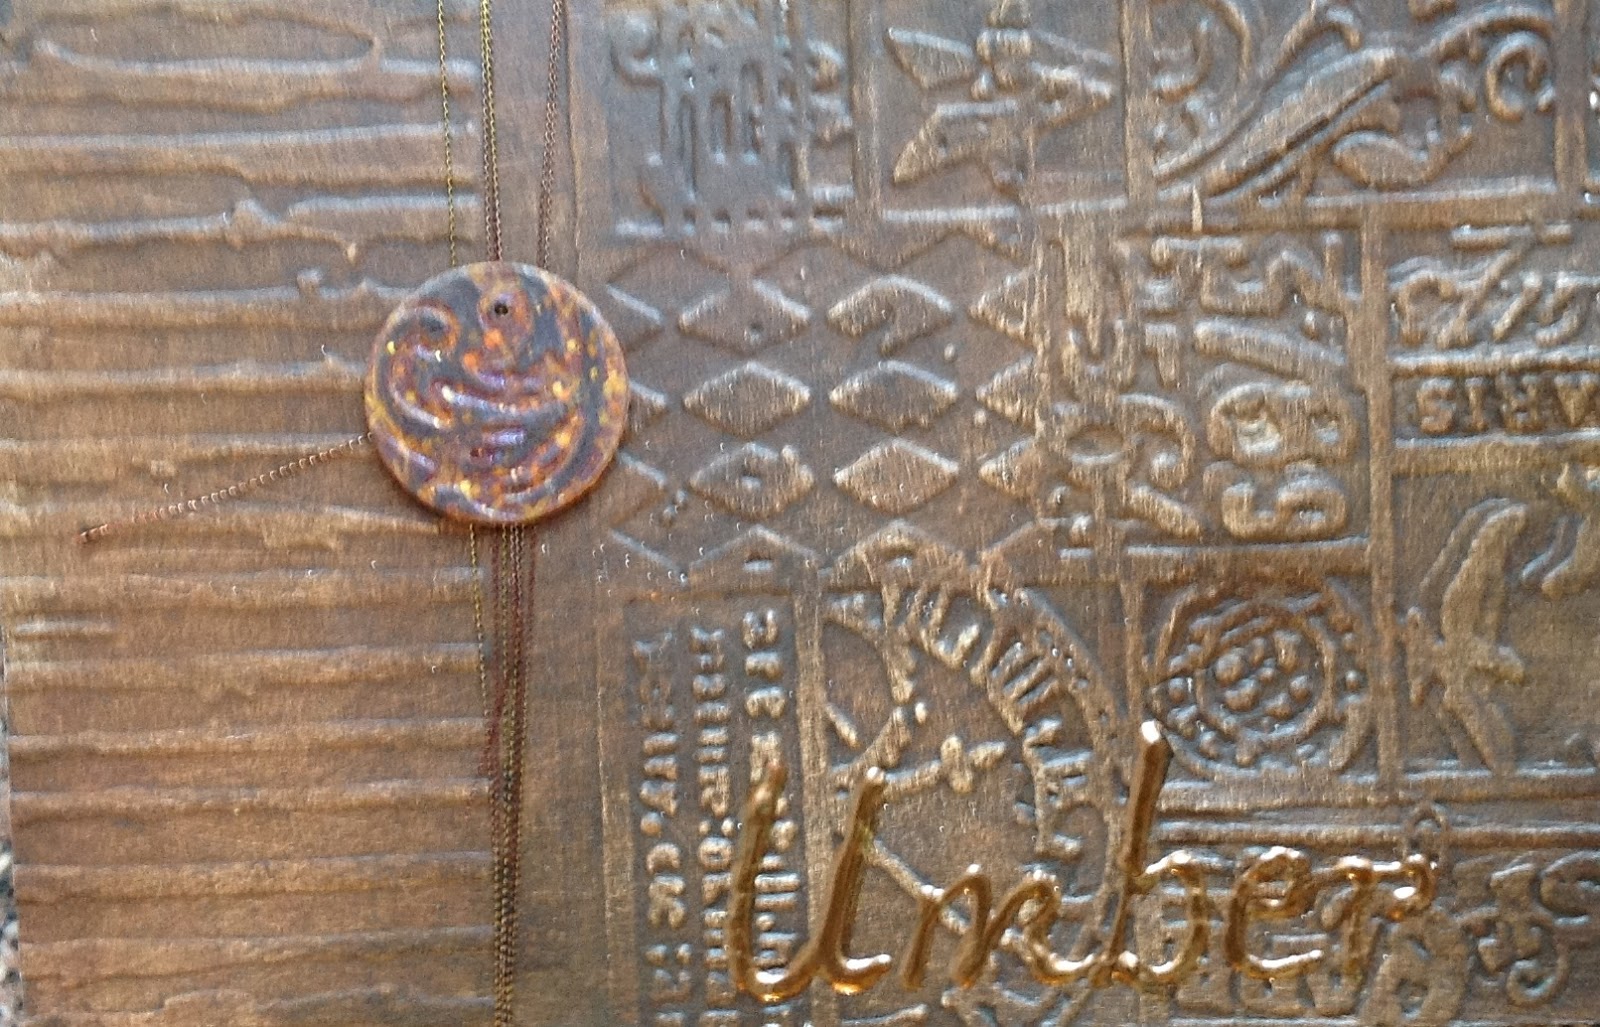
I added layers of Nickel Azo Gold, Transparent Burnt Orange, and Transparent Iron Oxide Red.  I painted some of the gold hearts with Turquoise, very thinly. I layered in Iridescent bronze at different points so there would be different colours of gold in the piece. It looks like rich leather.


This is similar, but more deep colours added - about 17 layers of paint here.


You can make it brighter, depending on which colours you use.  Somewhere in the middle of this, there was a Turquoise layer, which turned the yellowy areas green, and the reddish areas slightly greeny browny.

This is a really easy technique which produces really rich surfaces with lots of depth and deep shine.  The trick is just to have patience, and take the time to paint many layers but keep the layers really thin, and to make sure each layer is completely dry before adding the next (use a heat gun if you're as impatient as me!).


Saturday 29 December 2012

Alphabetica U & V

This month's Alphabetica pages relied heavily on Golden fluid acrylic paints and embossing folders put through the Wizard...

U is for Umber, embossed with 2 different embossing folders (Cuttlebug, Tim Holtz) painted with a couple of coats of Golden fluid acrylic raw umber, and the word 'umber' drawn with a Viva Pearl pen. The little circle is just a couple of layers of card, run through and embossing folder and painted.


The back of the card is done in the same way, but using burnt umber paint, somehow it always surprises me that burnt umber is lighter and richer than raw umber, I always imagine burnt things to be darker and greyer...


V is for violet was a bit more fun, I used a brocade embossing folder and Golden quinacridone violet.  This looks more like fuchsia or cerise to me than Violet, but they are a professional paint company and who am I to argue? The flower is organza, which I cut into circles, then cut towards the centres and held over a candle to make the 'petals', before attaching with a gold brad. The lettering is done with gold Stickles.


The back of V is Viridian. I like Viridian, it is very close to Teal/Turquoise, which is my favourite colour (you may have noticed this!). Same techniques as U & Violet. I was really tempted to add a little Treasure Gold to the high points, but then they wouldn't have been pure colours....


Friday 28 December 2012

Metal ATCs

For this swap, I needed to make 3 ATCs which featured metal. 

I decided to use metal tape, but to add image and texture by putting peel offs onto the card bases before applying the metal tape.  I also used Dyna tape labels for the words.

This is the first stage:


This is the next stage:


The first ATC is coloured with alcohol inks - butterscotch and lettuce with a touch of pesto.  I applied them all separately, but they pretty much mingled into one colour.  I added some more to mottle them, but it just blended, so I took the hint and left them alone!


The second ATC - 'oak' - was painted with several colours and coats of Pebeo glass paint, sanded with a fine sanding block, then overstamped with a tiny oak leaf in Brilliance Coffeebean ink. I wasn't thrilled with the outcome so put it to one side for a while.


I added some alcohol inks and felt it had improved.


The distressed damsel was also peel offs under metal tape, but this time I added a second layer of metal tape, and trapped a chipboard frame and image between the layers. I then painted the metal tape with Stewart Gill Byzantium paints, then sanded it down, and added a little Treasure Gold here and there, then sanded again to make the high points more prominent.


Tuesday 25 December 2012

12 days of Christmas presents

Each year on the UK Art Swaps group, we run a '12 Days of Christmas' swap, where each player makes 12 small gifts, wraps and sends them to 'Mother Santa', who swaps them out and sends a set of 12 gifts to each player.

Some of us start opening one present a day from 12th December onwards, some wait until Xmas Day to open them all, and some probably open them all the moment the package arrives!

The hardest part of the swap is deciding what to make.  It needs to be reasonably small, and light, so that the postage doesn't cost too much. The cost of making the gifts is also a factor because when you're making 12 of something the costs can mount up quite quickly.

This year I decided to make some brooches.  I used some recycled wool fabric for the base, and needlefelted wool rovings onto both sides, to make a fairly sturdy felted fabric. 

I cut leaf shapes from this felt base, and machine sewed velvet leaf shapes onto them.  I used variegated Perle thread in my bottom bobbin to sew round the edges of the velvet, and the leaf 'veins'.

I sewed around each brooch a few times using metallic thread, so that each brooch has a subtle hint of glimmer.

To finish the brooches off, I got out my needles and thread and hand sewed french knots and beads to the fronts, and brooch backs to the backs.

I hope the recipients like them!


A closer view.


Friday 7 December 2012

My rusty heart ATC


This month's ATC theme was 'rust'. 

I decided my neglected heart is getting rusty, and thought I'd interpret that in the ATC.

The background is cardboard painted with Modern Options iron surfacer, left for 12 hours then painted with  Modern Options rust solution.  It didn't get rusty enough, so I gave it another coat of the rust solution a few hours later.

Somewhere on my travels, I bought a small roll of rusty mesh, I added strips of this, held in place with some brown heart brads.


The heart is card, embossed in a cuttlebug folder, then painted with Golden micaceous iron oxide mixed with some  umber, red and orange fluid acrylic paints.  This gave it the colour I wanted, but the texture was a bit too fine and wasn't rusty enough, so I added Distress embossing powder to the high points.

The heart is adhered onto the background with some little sticky foam pads, to give it a little depth.

I really like this one. Glad I get to keep one.

Guestbook

Copyright

Please note that I assert myself as the creator of all art on this site (unless I credit another artist) and retain copyright of all artwork posted on this site