Saturday 26 May 2007

Stampbord


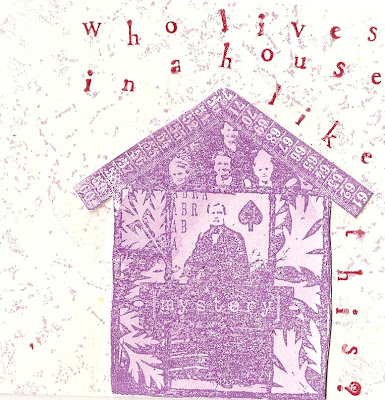
I have been playing with Stampbord.
My friend Jessie sent me a sample a while ago,
and I made an ATC,

which you can see above on the left.

The Stampbord takes the ink beautifully,
and sort of glows with colour.
I coloured the ATC with fluid chalk inks,
and stamped the image with black Stazon ink.


When I went to Port Sunlight stamping show
a couple of weeks ago, one of the demonstrators
was using Stampbord in a very different way.


She was spraying water onto the Stampbord, then heating it
using a heat tool - and the Stampbord bubbled!
I loved the effect, and promptly bought a mixed pack.


I went to Pauline's house that evening,
and we tried to make the Stampbord bubble.

We tried with several pieces and they were all miserable
failures - we couldn't work out what we were doing differently.

I tried again today, and managed to make the Stampbord bubble!!!!

Pauline and I had been using a Ranger Heat It heat tool, and it
doesn't get hot enough to make the Stampbord bubble.
I love my Ranger heat tool,
and have actually bought 2 spare tools recently
as I have heard that the UK Health & Safety police have said
it can no longer be imported into the UK
because it looks too much like a hairdryer...


I usually use it in preference to the other one I have,
but I have finally found something it doesn't do!!!

If you want your Stampbord to bubble,
liberally spritz it with water and
zap it with the 'milwaukee' type heat tool,
and it will bubble in unpredictable ways.
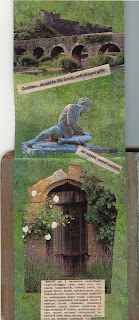
Once it has bubbled, you can colour and decorate it -
the purple piece above right was done with
Sticky Fingers acrylic inks,
and stamped with black Stazon,
then scraped here and there.

Thursday 24 May 2007

Personalised ATC swap

I just completed a 'Personalised ATC' swap,
where each swapper listed 3 things they love,
and their swap partner incorporated these
things into the ATCs they make & send.


Rhonda in Australia was my partner for the swap, and she chose:
'textured backgrounds', 'fantasy film', and 'friendly plastic'.
I hope she likes the resulting ATCs!

The one on the left was made by adding a couple of layers of Opals embossing powders and heating, then putting a layer of fantasy film on top and stamping into it while it was all still hot, finally adding a friendly plastic sun embellishment.

The middle and right hand ATCs are both Opals embossing powders, stamped into while still hot, with friendly plastic embellishments.

Saturday 19 May 2007

Weird & whimsical

Today I created some chunky pages.
The theme was 'Whimsy', but I think I may have reached
the dark side of whimsy and ended up in weird!


By the time I came to create the back of the page,
I was well past whimsy and definitely into weird!


I will send them off to Sweetpea,
but if a more whimsical idea arrives before Monday,

I may create another set of floatier,
will o' the wisp style pages, too!

Thursday 17 May 2007

Altered board books 2


I may be getting the hang of blogging
but my new scanner is defeating me....

My old Canon used to take great scans of 3D objects, but this HP one
definitely doesn't like things protruding from the page!

I wish the image was better, but perhaps it is fitting,
as Bren's book has been the most challenging yet.

The theme was YOU (as in ME!!!) and I found it really
difficult - perhaps I don't know who I am...
But I do know what I like, so went with that.

The background was something I wanted to try out, and I really love
the effect - it is pieces of shiny metal repair tape from the DIY store,
all cut up into small rectangles and stuck down,
then little dents put in using the end of a dry embossing tool.

I coloured it with stream alcohol ink and some gold mixative.
I took a permanent marker and wrote things about myself,
my likes, loves, and dislikes around the edge of the page.

At this point I came to a complete standstill for a couple of weeks
because I couldn't decide which images to finish the page with,
or how to apply them. I have laid many stamped images
and photographs onto the page
and taken them off as they just weren't 'right'.

Finally, I realised I didn't want to obscure the background,
so as you can see, I have used packing tape transfers
for the images - all of which are of things I love!

Altered board books

I have been taking part in an altered board book round robin. Each book has been an opportunity to experiment and play with new techniques and products.


Each book had a theme - Trish's ( above) is WOMEN.
This is the first one I did - Trish wanted her book collaged,
and collage is not something I have done before!


Pauline's book (below) was on the theme of SECRET SANCTUARY,
and I had a lot of fun with patina solutions and lift up flaps!!!


For the lift up flaps, I first created a
background using Stewart Gill
Byzantia paint, and stamped onto it using
Stazon and a Stampers Anonymous image.


I collaged images of all sorts of things I thought
should be in a secret sanctuary!


Helen's book (above) was on the theme of GROWING THINGS,
and was somewhat of a challenge,
as I had decided to experiment with transfers,
and they didn't all go quite to plan.


Chrissy's theme was FRIENDSHIP,
and I struggled with finding images to illustrate the theme,
but had fun playing with Gesso and H2Os for the background!

String challenge


Trish posted a challenge to use string in your art. I stuck some string onto the tack'n'peel on an acrylic block, and inked it up with dye ink. I stamped it onto some left over pieces of my colorwash spray backgrounds - the one on the left is the 'raw material' stamped with the string.

I coated the middle one with versamark and 3 layers of clear embossing powder - interesting how the versamark brought the rust colour out from the background.

The ATC on the right is one I did using the string stamped background - you hardly know it's there but it does give an interesting 'stone like' effect behind the image.

Monday 14 May 2007

Port Sunlight

I spent an interesting day at a stamping show in a lovely venue - an arts & crafts style hall called Hulme Hall in Port Sunlight, near Liverpool - Port Sunlight is a village built by a wealthy victorian businessman to house all the workers from his factory, and is laid out beautifully, with lots of green spaces and attractive homes.

I met some of my online friends, and spent way too much money - but have lots of goodies to show for it!!!

I bought some rather nice acrylic inks and lustre colourwash sprays made by Sticky Fingers - a Lancashire based company. I wish they would get a website of their own with artwork samples, because their products are wonderful!

Thursday 10 May 2007

Putting it all together


The elements have all come together.
The finished front is above, the finished back below.


Resistance is futile

I've been playing with Briliance ink & glossy cardstock... this is Galaxy gold stamped onto glossy, with stream Adirondack stamped on top using a texture stamp, then Adirondack rust & stream sponged on and rubbed off. Polished the whole piece until glossy again...


I've also been playing with the Ranger colorwashes, the stream was a little too intense for the look I wanted, so I diluted it 3 parts water to one part colorwash, then sprayed some cheap white cardstock. Once dry, I sprayed terra cotta color wash over the top.

More mirror card


I coloured my textured mirror card with alcohol inks - Stream & Rust. It looks much better and more brightly coloured in real life - I am discovering the limitations of scanners in capturing the
shininess!


I also created this mirror card ATC, again coloured with alcohol inks, but with some stamping and heat embossing, too.

I like this mirror card a lot - my latest passion!

Wednesday 9 May 2007

Birthdays

Today is my birthday - I have entered the second year of my second second half century at 51 - and although many people wouldn't feel this is a particular cause for celebration, I am just pleased to be celebrating every birthday since my breast cancer diagnosis in summer 2005!

Friends from all over the world have sent me much appreciated hand crafted cards and gifts, and Trish sent me a fabulous canvas!!! I love the canvas, and the sentiment, also.


Monday 7 May 2007

Mirror card


I have been playing with mirror card. It has interesting possibilities. I am working on a chunky book and want the pages to be very colourful but also interestingly textured. I took some mirror card and stamped it using a texture stamp & versamark ink. I then added Stewart Gill Lead patina embossing powder and heat embossed. I will colour the page with alcohol inks, and then add the main image by layering another piece onto this background.


This is an ATC background experiment. I took some silver mirror card, and coloured it with yellow & red Pinata alcohol inks. I didn't much like it, the inks don't seem to blend together as well as the Ranger alcohol inks, and it looked a bit 'spotty'. I stamped it with versamark and a texture stamp, then heat embossed with a deep green embossing powder. This was a big improvement. The colours were still too harsh, so I gave it a quick dab or three of Stream alcohol ink, which turned the underlying yellow & red inks into greens and a reddy brown. I really like this now, all I have to think of is how to add an image without spoiling the background!


The last mirror card experiment of the day was a happy accident! I had coloured some silver mirror card with Stream alcohol ink, and wanted to add a gold dragonfly image. I wanted instant gratification, and didn't wait long enough for the alcohol ink to dry properly. I stamped my dragonfly with versamark, and coated the card with gold embossing powder. When I tapped the powder off, there were splodges of embossing powder all over the card - in all the areas where the alcohol ink had been thickest. Not what I wanted at all! I decided to try and retrieve the card by brushing the embossing powder off. It brushed off beautifully, and then I discovered that the alcohol ink had been brushed off with the versamark and embossing powder, leaving the mirro card showing through to make a silver image. I know that Stazon will dissolve alcohol ink, but the results are not crisp and clear, or even very predictable! This image is very clear and fine - even if the scan isn't! I had planned to stamp and emboss the image again, but this is so ethereal, I don't want to cover it up. And the next time I create this effect it will be intentional!!!


On a completely different topic, it is a public holiday here in the UK, and in our normal tradition for public holidays, it is raining!!!! We have had several weeks of gorgeously sunny and warm weather, and we really need the rain, but I had quite forgotten how grey the day can seem without sunshine. The sunshione and warmth have made several of my garden plants peform spectacularly this year, and they are so beautiful I thought I would share:


Sunday 6 May 2007

First canvas

I joined a swap which required me to create an item which included a transferred image. I have been playing with packing tape transfers and gel medium transfers recently, and decided to see if I could transfer an image onto a canvas using gel medium.

First I painted the canvas using H2Os, in several greens and blues.

Then I gave a some beautiful gift wrap several thin coats of gel medium, allowing each layer to dry thoroughly.

Then I started painting gel medium onto the canvas, ready to accept the transfer - first mistake! The H2Os started smearing all over the place, so I quickly brushed a thicker layer of gel onto the canvas, slapped the gelled up gift wrap on top, and rubbed hard all over the back of the gift wrap. I left it all to dry overnight, then carefully wet the back of the paper and rubbed all the wet paper off the image with my finger. And this is what I found:


So far, so good! I had another image I wanted to add to the right hand side of the canvas, of a woman underwater, rising to the surface. So I repeated the procedure. Disaster. the image had been printed on much better quality glossy, coated paper, and although I rubbed and rubbed and rubbed, I could not get a clear image. So I painted over it!!!


I used my favourite Stewart Gill Byzantia paint. I still didn't like it, so I stamped it with a texture stamp, added some grainy embossing powder, and heat embossed it. I still didn't like it. I painted over it again!

I decided it was a garden of my imagination, and I love wildlife, so this garden needed wildlife. I found a couple of lizards, and painted them blue and green, so they were well camouflaged. I added them to the canvas, along with a mica and stone chip path, and the text reminding me to tend the garden of my imagination.


The canvas was looking good, but needed something in the top right quarter. I tried many ideas out, and eventually settled on a gel transfer of a fern. You would think I had learned by now? Nope. The transfer didn't go too well. It transferred fine, but I hadn't considered how dark the image was before transferring. It came out so dark I had trouble seeing what I had transferred. So I added a packing tape transfer of a lady in front of it for a little more interest. The finishing touch was some sticky backed letters, spelling the word 'garden', which I painted to tone in with the rest of the canvas.


I learnt a lot while creating this canvas -

1. H2Os do not become impervious to water once dry
2. Gel transfers are unpredictable.
3. Everything takes much longer to dry than you imagine it might
4. Mistakes are part of the learning process, and can be hidden!

Guestbook

Blog Archive

Copyright

Please note that I assert myself as the creator of all art on this site (unless I credit another artist) and retain copyright of all artwork posted on this site