I have been taking part in an international collaborative paperbag book, on the theme of 'Nature'. Each player made 2 sets of 12 pages, and mailed them to the hostess, who swapped them out, and sent each player some brown paper bags to help us turn the assorted pages into books.I coloured the edges of my paper bags with Starburst Stains. I bound the bags with the open ends alternating, and the binding being about 3/4 inch from the stubby end of the bag - leaving the stubby end as a 'half' page, as seen above. The binding was very simple, I just made 2 holes, and threaded the thread between the holes and around the ends, then tied the threads together and trimmed the ends off. I made 5 pages from decorated folded card to attach to the stubs, and added Nature themed quotations to those pages.I stuck half my pages back to back with tabs in between, to go into the 'pockets' created by the paper bags, and stuck the remainder on the bare pages. I added covers made from painted & collaged canvas, and added a little bronze German Scrap trim. Here's a picture of the spine of the book, showing the binding thread.
 I made 3 bundles of fibres in the colours of the covers, and threaded them through the binding threads, and tied them together in a half knot. This picture shows the cover with 2 bundles added. They cover the binding thread nicely!
 I added some letters to the cover, along with a lovely little rusty lizard who came home with me from last year's trip to Arizona. I'm really glad I've managed to bind everybody's gorgeous pages into a book which looks nice - I did wonder if I'd end up with another UFO at the back of the bookshelf....
 All I have to do now is bind last year's Meander pages, and the Angel chunky book pages from the year before...
I was in a metal squares swap on UKArtSwaps yahoo group, where we swapped 2 inch metal squares, and part of the swap was that we also had to create an item on which to display our squares.I decided to create a Beryl Taylor style accordion screen. Beryl's original screen was white, and was the subject of an article in issue 10 or 11 of Cloth Paper Scissors.  I decided that the colours of the metal squares would be best complemented with shades of violet and turquoise. I made a sheet of fabric paper by gluing paper napkins onto an old pillowcase, covering with tissue paper, and painting with watered down Golden fluid acrylic paints before the glue dried. I cut the fabric paper into 12 oblongs, and sewed buttons onto 6 of them, before backing them with felt. I tore some hot press watercolour paper into oblongs, before colouring it with watered down colourwashes. I sewed these onto the fabric paper backed with felt.I made some 'joints' by dyeing and sewing some of the pillowcase into 'sleeves' for the wood dowel. I coloured the dowels with Adirondack colourwash in Stream. I glued the 'sleeves' to the back of the felt, and backed with the fabric paper, before gluing the dowel in place.Finally, I glued the metal squares onto the watercolour paper.
 I'm really pleased with this as a way of displaying the squares.
Each month Lynne at the Altered Element will be sending something found in a charity shop, and which I will need to recycle into something completely different!This gorgeous William Morris fabric was in the April pack, along with several toning lace ribbons, ric rac and bias binding.  This Upcycle pack was clearly a sewing project. Only one problem - I don't really think of myself as a textile artist, or even somebody who sews!!!!
Oh, and our house is so upside down because of building work, that I can't get to a table to put the sewing machine on it. Which is how I discovered that I can use a sewing machine on top of a kitchen worktop, standing on one leg, whilst pressing the sewing machine's pedal with the other...After considering various options - a book cover, a cushion - I decided to make a shoulder bag. I have a book of bag designs, but they are all so SQUARE! Surely it wouldn't be any more work to make a bag with a different shape? And much more interesting...I cut a shield shape from some scrap card and used it as a template to cut 8 pieces from the fabric. I cut the remaining long strip into two, and used that to make the straps.I sewed the ribbons, ric rac and binding onto spare pieces of fabric paper, using embroidery stitches for the pale green ribbon. I made a 'flap' for the bag using more fabric paper and the rest of the ribbon.  I decided the ribbon panels and flap needed a bit of a lift so I covered them all with some sea green/blue organza, and sewed a few silk flowers here and there. I sewed the bag together with the panels, and added a magnetic closure under the flap. There are deep gussets at the sides of the bag, so it can hold quite a lot!
 When I started making this, I thought it might make a gift for somebody else. By the time I'd finished, I'd changed my mind and decided to keep it for myself!!! Although I didn't think a patterned bag was my style, I do have a couple of pretty plain turquoise outfits, and this will be a nice bag to use when wearing those...Thanks again to Lynne for lovely things to play with, and taking me in an unexpected direction!
My April DT pack arrived from Lynne at the Altered Element, and when I looked at the contents, I must admit that my first thought was 'What HAVE I done?'
I loved the colour combination, but didn't have much of a clue as to what to do with the contents of the pack! I recognised the black lightweight Lutradur, and the copper coloured metal and wire, but had no idea what to do with the stretchy twisted wire stuff (bouillon wire), or the curly shredded wire stuff (lametta curls)!  I thought I'd start somewhere in my comfort zone, so I applied some Golden light moulding paste to the Lutradur using a Crafty Notions stencil.
 I added copper colour with a Moonshadow Mist Incandescent Copper spray.
 I laid the Lutradur onto a spare piece of fabric paper left over from another project. I liked the look, so I sewed them together, then used my heat gun to distress the Lutradur.
 I liked the heart shaped leaves in the tree, so I punched some hearts from the metal sheet, and shaped them using a wooden stick sharpened to a point.
 I added these to the area below the tree, and sewed some beads around the tree, and the twisted stretchy wire stuff (bouillon wire) onto the tree. I decided that the focal piece needed a background to complement it, which also gave me the opportunity to use some more of the pack contents.I painted the edges of some thick card with copper acrylic paint, laid some more Lutradur over the copper, added the lametta curls at the corners, and covered the whole with some copper and blue two toned organza. I added a ribbon hanging loop and backed it with velvet paper.
 Finally, I glued the focal piece to the background. I never imagined producing anything like this, so am pleased that the contents of the pack took me out of my comfort zone and made me combine metal and textiles.
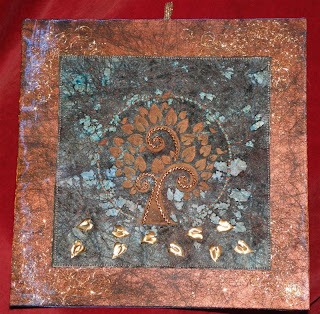
 The pack also contained some gorgeous Cosmic Shimmer thick embossing powder and some knitted wire tubing, but I didn't manage to incorporate those - I'm sure they'll come in handy for another project!
Copyright
Please note that I assert myself as the creator of all art on this site (unless I credit another artist) and retain copyright of all artwork posted on this site


 I made 3 bundles of fibres in the colours of the covers, and threaded them through the binding threads, and tied them together in a half knot. This picture shows the cover with 2 bundles added. They cover the binding thread nicely!


