
Shrink Plastic. Versatile stuff which comes in black, white, translucent and clear. Reputation for being tricky to use. But is it? If you work with it on a non stick surface, and use a 'hairdryer' type heat tool, I find it behaves itself. Just remember less is more when adding colour - what looks like pastel colour will turn out quite brightly! I use Stazon, Brilliance and Fluid Chalk inks successfully (although you have to leave the Brilliance to dry overnight or shrink the plastic VERY carefully!) Once it starts curling I often aim the heat gun at the underside and it kinds of curls back down.
This is a very different way of using Shrink Plastic - 'distressed shrink plastic', as taught to me by my friend Jessie in New Zealand. Take a piece of shrink plastic, a heat gun, a non stick craft sheet, a texture rubber stamp, and a metal skewer (or use your craft knife, palette knife or similar).
I used a piece of translucent shrink plastic about 2 x 2.5 inches.

Cut the shrinky stuff into irregular triangles and kite shapes. You can also punch holes in them at this point, it adds more texture to the finished piece. Pile them up on the craft sheet.
Have your metal skewer ready, and your rubber stamp. Heat the shrink plastic with your heat gun - preferably a 'hair dryer' type (it doesn't blow things around as much). It will start curling, if any pieces decide to leave the pile, push them back. when it looks as if it's all or nearly all shrunk, stamp into the pile with your rubber stamp - push down hard and hold the stamp there for about 30 seconds.
I wish I had another photo to show you how it looks now, but the one I took was too fuzzy.
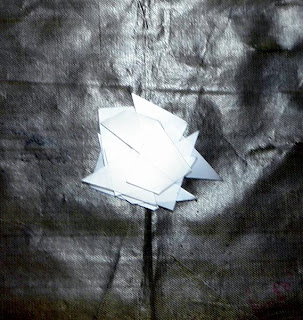
Your shrink plastic will look textured, and have an odd shape. It might not look too inspiring at this point. Persevere! Add colour - I use alcohol inks, but I guess acrylic paint or Stazon or Brilliance ink would work.
Once coloured, apply wax rub on to the edge with your finger, then go lightly over the top with the rub ons. I use Treasure Gold (Wendy will be surprised LOL) because of the depth of colour and the fact that it dries to a permanent finish. You can use the 'palette' type, and either use a fixative or wait a week until they have set permanently.
This is what you can expect it to look like at this point.
(sorry about the slightly fuzzy photo)

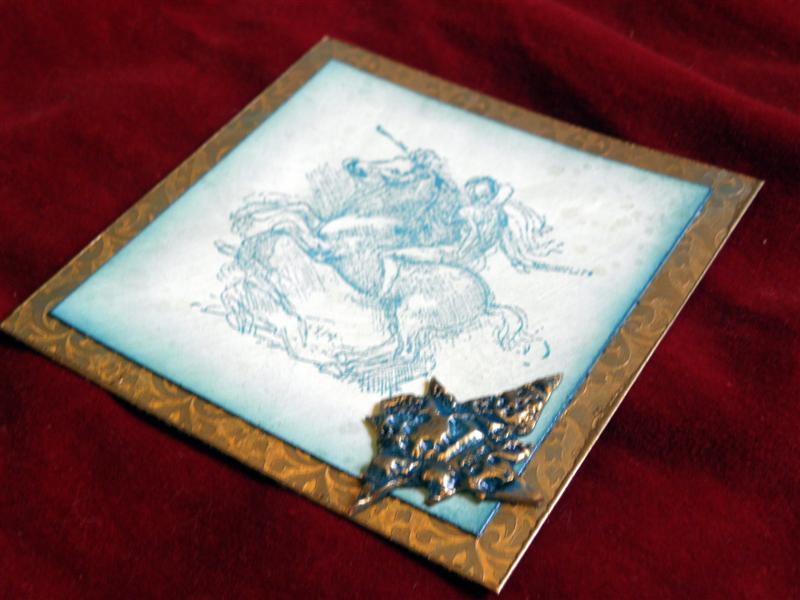
Here's another.

And this is how it adds dimension to my finished chunky book page - the page had looked too 'flat' to me, but I needed the embellishment to be unbreakable, quick, easy, and in the right colours for the page. This simple 'distressed shrink plastic' element does all of that, and was very quick and easy to make.

This is a very different way of using Shrink Plastic - 'distressed shrink plastic', as taught to me by my friend Jessie in New Zealand. Take a piece of shrink plastic, a heat gun, a non stick craft sheet, a texture rubber stamp, and a metal skewer (or use your craft knife, palette knife or similar).
I used a piece of translucent shrink plastic about 2 x 2.5 inches.

Cut the shrinky stuff into irregular triangles and kite shapes. You can also punch holes in them at this point, it adds more texture to the finished piece. Pile them up on the craft sheet.

Have your metal skewer ready, and your rubber stamp. Heat the shrink plastic with your heat gun - preferably a 'hair dryer' type (it doesn't blow things around as much). It will start curling, if any pieces decide to leave the pile, push them back. when it looks as if it's all or nearly all shrunk, stamp into the pile with your rubber stamp - push down hard and hold the stamp there for about 30 seconds.
I wish I had another photo to show you how it looks now, but the one I took was too fuzzy.
Your shrink plastic will look textured, and have an odd shape. It might not look too inspiring at this point. Persevere! Add colour - I use alcohol inks, but I guess acrylic paint or Stazon or Brilliance ink would work.
Once coloured, apply wax rub on to the edge with your finger, then go lightly over the top with the rub ons. I use Treasure Gold (Wendy will be surprised LOL) because of the depth of colour and the fact that it dries to a permanent finish. You can use the 'palette' type, and either use a fixative or wait a week until they have set permanently.
This is what you can expect it to look like at this point.
(sorry about the slightly fuzzy photo)

Here's another.

And this is how it adds dimension to my finished chunky book page - the page had looked too 'flat' to me, but I needed the embellishment to be unbreakable, quick, easy, and in the right colours for the page. This simple 'distressed shrink plastic' element does all of that, and was very quick and easy to make.


wow what an inspired way of using SP!
ReplyDeleteexcelent love how it turned out would make a lovely pendent to
ReplyDeleteHi Adrienne -
ReplyDeleteLovely piece of art and really like how the shrink plastic came out. I love shrink plastic, I use it for making charms, earrings,etc. It is so much fun to watch it shrink.
Elaine Allen