Tyvek is funny stuff - it is used in the building industry and in textile art. I remember the Guardian printing a newspaper supplement on it sometuime around 1990, anmd saying how it would be one of the materials of the future... but I never imagined I would be making art out of it!
I coloured the tyvek with watered down acrylic paint, applied using a baby wipe. You only need a thin layer of paint, especially if you are going to heat the tyvek, as the paint acts as a resists to the heat - so, lots of paint=difficult to heat & distort. I coloured both sides of the tyvek, you can see the coarse 'fibres' take colour differently to the finer ones.

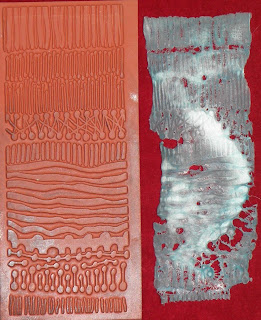
Next, I cut the tyvek up and laid pieces onto deeply etched rubber stamps with bold designs, added a layer of silicone paper to protect my iron, and used the iron (on a cotton setting) to heat and shrink the tyvek. This process can be unpredictable - my iron wasn't hot enough the first time, so I was left with big patches of unmelted tyvek, and it was too hot the next time, so the tyvek disappeared! This is about right, when it melets soem away completely but doesn't leave you with unmelted areas. I need to fine tune it a little bit more as it is still melting more tyvek away than I'd like, whilst leaving patches unmelted.


Next, I tore the melted tyvek into smaller pieces, and added them to a mask (protected the mask form with greased aluminium foil) covered in Perfect Paper whilst it was still wet. The perfect paper dried and the tyvek is inlaid into it. I think I may add colour to the paper parts, and Treasure Gold to add glints afterwartds. I may even post a pic when it's finished!

I coloured the tyvek with watered down acrylic paint, applied using a baby wipe. You only need a thin layer of paint, especially if you are going to heat the tyvek, as the paint acts as a resists to the heat - so, lots of paint=difficult to heat & distort. I coloured both sides of the tyvek, you can see the coarse 'fibres' take colour differently to the finer ones.

Next, I cut the tyvek up and laid pieces onto deeply etched rubber stamps with bold designs, added a layer of silicone paper to protect my iron, and used the iron (on a cotton setting) to heat and shrink the tyvek. This process can be unpredictable - my iron wasn't hot enough the first time, so I was left with big patches of unmelted tyvek, and it was too hot the next time, so the tyvek disappeared! This is about right, when it melets soem away completely but doesn't leave you with unmelted areas. I need to fine tune it a little bit more as it is still melting more tyvek away than I'd like, whilst leaving patches unmelted.


Next, I tore the melted tyvek into smaller pieces, and added them to a mask (protected the mask form with greased aluminium foil) covered in Perfect Paper whilst it was still wet. The perfect paper dried and the tyvek is inlaid into it. I think I may add colour to the paper parts, and Treasure Gold to add glints afterwartds. I may even post a pic when it's finished!


As always, so inspiring. My first encounters with Tyvek were a nightmare and I found I preferred the things that just happened to the results where I had a plan - that didn't work.
ReplyDeletesome great tips here, Tyvek and I dont get on too well, think maybe I have been using my paint too thick, never thought of stamping into it either.
ReplyDeleteThank you x
I love to see your new experiments,and have become a follower :-)
ReplyDelete