I will send a handmade gift to the first 3 people who leave a comment on my blog requesting to join this Pay It Forward exchange. I don’t know what that gift will be yet and you may not receive it tomorrow, or next week, but you will receive it within 365 days, that is my promise! The only thing you have to do in return is pay it forward by making the same promise on your blog. So basically, if you comment and you’re on, I’ll send you something crafty that I’ll make!
Once you sign up, copy and paste the above paragraph on your blog, and three other lucky people will be recipients of your handmade work. I'm getting paid forward by Carol Sweeney and thought it would be fun to pay it forward to you. I will check my blog daily to see who the first three sign ups are, and if they've joined this Pay It Forward exchange, they will be the recipients from me. Make sure to leave your blog address with your message, so I can check your blog.

Thursday, 29 November 2007

Sunday, 25 November 2007


Stampers Anonymous ATC
The deadline was looming for a swap using a Stampers Anonymous stamp,
and all but a few of my stamps & craft supplies
are hiding behind a mountain of furniture - moved as a
result of remodelling my living room.
and all but a few of my stamps & craft supplies
are hiding behind a mountain of furniture - moved as a
result of remodelling my living room.

Luckily, I had taken this stamp to Art & Soul with me,
along with my Stazon and a few alcohol inks..
I hope my swap partner likes the result!
along with my Stazon and a few alcohol inks..
I hope my swap partner likes the result!
Friday, 23 November 2007
ATCs using gesso background in last post

My scanner doesn't like 3-D...
the embellishments are paper castings,
and look better in real life!
the embellishments are paper castings,
and look better in real life!
Sunday, 18 November 2007
Italian Gesso background
I needed to create an ATC for a swap,
and as most of my supplies are still inaccessible (house renovations),
I am limited to using the supplies I took to the US.
I have decided that this is a good thing,
as I am having to think differently.
The theme of this swap was 'geographic/place',
so I looked at my supplies (and the rest of the house),
and this is what I came up with:

I took a sheet of cardstock, some liquid acrylic medium,
white gesso, 2 amaretto biscuit wrappers,
some photographs torn from a sheet of printed paper,
a paintbrush, a sheet of kitchen paper towel,
and one drop each of 3 colours of fluid acrylic paint -
paynes grey, transparent yellow iron oxide, transparent red iron oxide.
Tear the biscuit wrappers, mix the gesso and acrylic medium and use
to adhere the papers to the card.
Add small amounts of colour into the mixed gesso & medium,
and use the resulting mess to glue the small pieces
of printed paper onto the background.
Paint mixture over the small pieces of paper,
wipe off with the kitchen paper.
Use some of the left over paint/gesso mix
to randomly daub the sheet between the photographs,
wipe off with kitchen paper.
Allow to dry, use as backgrounds....
Wednesday, 14 November 2007
Knitting!
I don't knit very often. I used to knit jumpers for all the family while I was bringing up children, and had to do fancy patterns because plain knitting didn't hold my interest. I recently saw a beautiful scarf, but thought it was too expensive, and decided to find some similar wool to knit my own.
Well, I failed to find any remotely similar wool, but while I was looking, I saw and fell in love with some hand dyed merino wool.... and ended up buying 2 skeins at £12.50/$25 a skein... plus a pattern book... so my finished scarf will have cost almost twice the 'too expensive' scarf I saw in the first place. And that's without considering the hours it took to knit - around 45, I think!
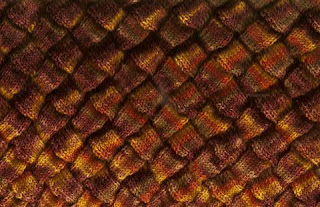
Anyway, here is part of the scarf - and as my friend Maggi said 'you will have a unique piece when you are done'. It's certainly unique, and has drawn all sorts of comments from people who saw it while I was knitting on planes, in airports, at markets, at work... The pattern is called 'entrelac' and you can get very different effects according to the size of needles, and the thickness & fluffiness of wool you choose.
Well, I failed to find any remotely similar wool, but while I was looking, I saw and fell in love with some hand dyed merino wool.... and ended up buying 2 skeins at £12.50/$25 a skein... plus a pattern book... so my finished scarf will have cost almost twice the 'too expensive' scarf I saw in the first place. And that's without considering the hours it took to knit - around 45, I think!

Anyway, here is part of the scarf - and as my friend Maggi said 'you will have a unique piece when you are done'. It's certainly unique, and has drawn all sorts of comments from people who saw it while I was knitting on planes, in airports, at markets, at work... The pattern is called 'entrelac' and you can get very different effects according to the size of needles, and the thickness & fluffiness of wool you choose.
Thursday, 8 November 2007
Sally Jean Alexander's Art & Soul class
Sally's class was the only Art & Soul class I took where the teacher set some 'rules'. We weren't allowed to take photographs during her demonstration, and no 'visitors' were allowed into the classroom, even at lunchtime.
We made a 'divine shrine' by cutting the corner off 4 cardboard boxes and gluing the 4 corners together to give 4 'niches' for artwork. We decorated the niches by mixing acrylic paint with liquid gel medium, and using it as a glue paint, to add colour and also adhere small pieces of printed papers - words form old books, gift wrap, printed papers & images. We used caulk, applied with a toothpick, to adhere objects inside the niches.
Once the artwork was finished, we cut glass to fit the sides, and ground the edges. We copper taped the edges of the glass and the artwork, then painted the copper tape with flux before soldering. My piece had a ground down glass 'stand' which was also copper taped and fluxed so that it could be soldered to the bottom of my shrine.
The shrine took a life of its own as far as the theme went. Sally had told us to bring something precious for our shrines, but I couldn't visualise the finished shrine so only took enough for one 'niche'. I took a watch face and several watch parts. I decorated one side of my shrine, and realised that it represented my father to me (he was a jeweller).

I then looked through my various papers and embellishments, searching for inspiration for the other 3 niches. I found a small broken paintbrush, and some 'Italy themed' stamps I bought at vendor night, and realised that these represented my mother (who paints, and whose ancestry is Italian).

Once I had my father and mother, it seemed obvious that one side of my shrine should be devoted to my husband, and I found a 'gold' (plastic) ring and some 'lucky heather' in my embellishments bag, and some appropriate text in a book....

The final side was a problem - until I realised it needed to be about me! I love the country I live in, and had also just learned that I had landed a dream job - developing education at 127 historic sites across Wales, including Caernarfon Castle. So, finding a piece of gift wrap with images of Caernarfon Castle on it was total serendipity! The other elements in this niche are a small shell to represent the coastline that is on 3 sides of Wales, some lichen to represent the clean air, a twig to represent the trees, and some text representing the mountains and warm welcome offered here in Wales...

All in all, I enjoyed making my shrine, but feel my soldering needs a lot of improvement!
Wednesday, 7 November 2007
Beryl Taylor's Art & Soul class
Beryl Taylor is a British born artist who now lives in the US.
Beryl originally trained as a fabric artist,
but now incorporates some paper art ideas
and techniques into her work,
and is described as a 'mixed media artist'.
I think her work is stunning:
http://www.beryltaylor.com/
and she has also written a beautiful book:
http://tinyurl.com/yvsukb
The class at Art & Soul was 'making fabric paper'
and involved layering muslin (US)
or fine lawn cotton (UK)
with printed papers and tissue paper
and paint to make a 'fabric paper'.
The technique is described in Beryl's book.
The 'paper' is easy to make but takes a long time to dry.
It took us a good hour of the class
and also the lunch hour
to get our pieces dry enough to work on.
I think it might have been better to
spread the class over 2 evenings -
one making the paper,
the second creating the artwork.
Once we had made out papers,
we glued pieces to felt,
layered them, added stitches & beads,
and finished them off by edging them
with Aileens' tacky glue, coated in Krylon.
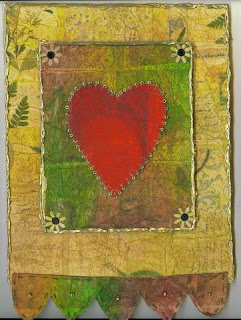 Beryl's sample piece was mounted onto matt board.
I will mount mine and have it framed soon.
Beryl originally trained as a fabric artist,
but now incorporates some paper art ideas
and techniques into her work,
and is described as a 'mixed media artist'.
I think her work is stunning:
http://www.beryltaylor.com/
and she has also written a beautiful book:
http://tinyurl.com/yvsukb
The class at Art & Soul was 'making fabric paper'
and involved layering muslin (US)
or fine lawn cotton (UK)
with printed papers and tissue paper
and paint to make a 'fabric paper'.
The technique is described in Beryl's book.
The 'paper' is easy to make but takes a long time to dry.
It took us a good hour of the class
and also the lunch hour
to get our pieces dry enough to work on.
I think it might have been better to
spread the class over 2 evenings -
one making the paper,
the second creating the artwork.
Once we had made out papers,
we glued pieces to felt,
layered them, added stitches & beads,
and finished them off by edging them
with Aileens' tacky glue, coated in Krylon.
 Beryl's sample piece was mounted onto matt board.
I will mount mine and have it framed soon.
Tuesday, 6 November 2007
Claudine Hellmuth's Art & Soul class part 3
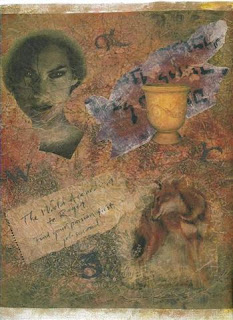
This is a piece - A4 size - that I created in class, using a 'faux leather' background made by crumpling a magazine page, rubbing with Nevrdull, and then painting with a glaze of Golden fluid acrylics in one or two colours and adding a few touches of metallic pastels. The collaged elements were all altered by rubbing with Nevrdull.
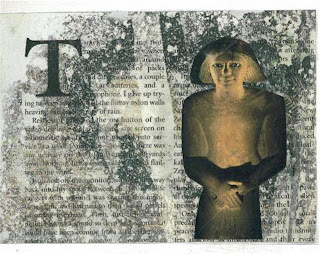
This piece has a background of part of a National Geographic/Citrasolv page (glued onto canvas paper to give it some 'body', with an image cut from a magazine page glued on. It is not finished yet, I am waiting until I see a suitable Egyptian element to add to the page, in the space under the 'T'.
The final sample took only a few minutes to make - it is an area of a National Geographic page glued to canvas paper, with a 'Nevrdulled' flower and some text collaged onto the page. Quick, easy, and looks as if I spent some time on it!!!
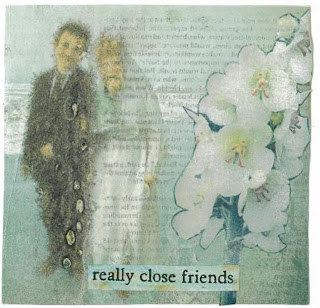

This piece has a background of part of a National Geographic/Citrasolv page (glued onto canvas paper to give it some 'body', with an image cut from a magazine page glued on. It is not finished yet, I am waiting until I see a suitable Egyptian element to add to the page, in the space under the 'T'.

The final sample took only a few minutes to make - it is an area of a National Geographic page glued to canvas paper, with a 'Nevrdulled' flower and some text collaged onto the page. Quick, easy, and looks as if I spent some time on it!!!

Claudine Hellmuth's Art & Soul class part 2
The second technique demonstrated in Claudine's class involved concentrated Citrasolv & National Geographic magazines, along with some paper kitchen towel and cling film.
The diluted 'ready to use' Citrasolv doesn't work for this technique, and I doubt if many other magazines would, either.
National Geographic lays down a very thin layer of gold ink underneath its printed photographs, and the Citrasolv and gold ink work their magic together and produce beautiful background papers; many of them look like works by Klimt as the gold ink seems to come to the surface but with many ovals splodges of other colours, as shown here:

Text and image transfers to the opposite page,
too, as you can see below.
too, as you can see below.

It only seems to work if you do lots of pages together. Everything smells wonderfully orangey while you are working and also the papers will smell of oranges for a LONG time afterwards... If you don't like the smell of oranges, this is not the technique for you!
So, grab your concentrated Citrasolv, and use kitchen paper towel to apply it to a NG page - a generous coating, but not enough to puddle. Turn the page and coat the other side. Coat the next page, and the next, and the next, until you have coated the whole magazine with Citrasolv. Insert crumpled cling film (saran wrap) in between some of the pages - especially on double page photo spreads. These pages will have an interesting texture, as in the sample below.
So, grab your concentrated Citrasolv, and use kitchen paper towel to apply it to a NG page - a generous coating, but not enough to puddle. Turn the page and coat the other side. Coat the next page, and the next, and the next, until you have coated the whole magazine with Citrasolv. Insert crumpled cling film (saran wrap) in between some of the pages - especially on double page photo spreads. These pages will have an interesting texture, as in the sample below.

Thursday, 1 November 2007
Claudine Hellmuth's Art & Soul class - part 1
Well, this class was like being back in kindergarten!!! Everybody was that excited about what we were doing, and there were lots of 'ooohs' and 'aaahs'!!! Claudine introduced us to the world of household chemicals combined with magazine pages....
The first technique uses Nevrdull (or a similar product called Duraglit) which is chemical impregnated wadding intended for polishing metal. Neverdull is available in automotive stores in the US, and also in larger branches of Walmart. Duraglit is available in supermarkets in the UK intended for polishing doorknobs and knockers and other household metal objects - it may be in the process of changing it's name to Brasso, but if you buy brasso make sure it's not the liquid.
Basically, the wadding acts as an eraser on colour magazine pages. So, you can remove all the colour and image, or fade an image, or play with an image by removing parts...
Here are a couple of examples of what I did:
 I removed a line of washing strung between the trees,
then removed even more colour, using a stencil, to create a 'ghost'
 I gently rubbed over the whole picture,
then rubbed another couple of times around the edges, to create a 'faded' look
 I folded the whole picture up, then re-folded the other way,
using the same fold lines, to deepen them.
I rubbed all over to take away quite a lot of colour,
and created a 'faux tile' effect.
 I used a piece of punchinella (sequin waste) with
large diameter holes as a stencil for this one.
 If you scrunch the paper up into a tight ball,
then flatten out and scrunch up again,
you create lots of neat fold lines.
Remove some colour and you create a 'leathery' look - in
the sample above I left enough colour for you to see what the image was,
and it gives a 'French Impressionist' feel to the page.
I completely removed the logo
and the 'catchphrase' at the bottom of the advert,
but left the text at the top - is it like some indistinct poem,
adding something to the overall piece.
You may not be able to see that unless you double click on the picture.
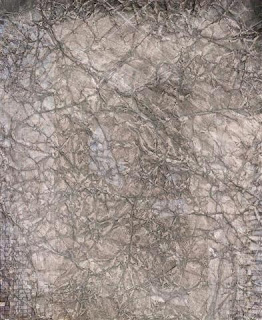 This is another 'faux leather' piece,
but this time I went over it several times with the Nevrdull,
and removed most of the colour.
I will post the other technique in a separate blog entry,
along with some finished artwork
The first technique uses Nevrdull (or a similar product called Duraglit) which is chemical impregnated wadding intended for polishing metal. Neverdull is available in automotive stores in the US, and also in larger branches of Walmart. Duraglit is available in supermarkets in the UK intended for polishing doorknobs and knockers and other household metal objects - it may be in the process of changing it's name to Brasso, but if you buy brasso make sure it's not the liquid.
Basically, the wadding acts as an eraser on colour magazine pages. So, you can remove all the colour and image, or fade an image, or play with an image by removing parts...
Here are a couple of examples of what I did:
 I removed a line of washing strung between the trees,
then removed even more colour, using a stencil, to create a 'ghost'
 I gently rubbed over the whole picture,
then rubbed another couple of times around the edges, to create a 'faded' look
 I folded the whole picture up, then re-folded the other way,
using the same fold lines, to deepen them.
I rubbed all over to take away quite a lot of colour,
and created a 'faux tile' effect.
 I used a piece of punchinella (sequin waste) with
large diameter holes as a stencil for this one.
 If you scrunch the paper up into a tight ball,
then flatten out and scrunch up again,
you create lots of neat fold lines.
Remove some colour and you create a 'leathery' look - in
the sample above I left enough colour for you to see what the image was,
and it gives a 'French Impressionist' feel to the page.
I completely removed the logo
and the 'catchphrase' at the bottom of the advert,
but left the text at the top - is it like some indistinct poem,
adding something to the overall piece.
You may not be able to see that unless you double click on the picture.
 This is another 'faux leather' piece,
but this time I went over it several times with the Nevrdull,
and removed most of the colour.
I will post the other technique in a separate blog entry,
along with some finished artwork
Tuesday, 30 October 2007
Robert Dancik 'Faux Bone' Art & Soul class
This evening class was a complete stretch for me - a completely new material to work with, and I didn't even know how to use the tools!!! Robert is a patient teacher with a good sense of humour. He taught us how to put a blade into a jeweller's saw, and how to put a bench pin onto a bench. Then he taught us how to use the jeweller's saw and bench pin! The aim was to produce an 'amulet pendant' with the faux bone, and have sterling silver fixings.
Robert explained what 'faux bone' is ( http://www.fauxbone.com/ ) and how to shape it - and then we started sawing, filing, sanding and polishing. Once we were happy with our basic shape, it needed decorating. I 'engraved' mine with an awl, and then set about making it look old. Faux bone is brilliant white until you 'age' it. It took about 15 layers of shoe polish & acrylic paint to get mine the way I wanted it. I believe that if I had had the courage to leave the acrylic paint on for longer each time, the process would have been quicker!
Finally, I used the metalworking skills acquired in the Beverly Gilbert class to cut the silver, wrap around the top of the piece, and rivet together. I also added a rivet as decoration about 2/3 of the way down. As we were so short of time - and we were already an hour later finishing than published - Robert drilled all the holes in the piece for me. I really think this should have been a whole day class, as this is the only project I didn't finish in a week of classes, and I know I was not alone!!!

All I have to do to finish it is to add 2 eyepins to the top so that I can use it as a pendant. The wires are cut ready...
It was a great class, and I would love to find the time to experiment more with the faux bone.
Monday, 29 October 2007
Ann Baldwin Art & Soul class
Day 3 of Art & Soul was a change from metal and beads and organisation. I took Ann Baldwin's 'Collaging with words & paint - Text & Texture' class. I haven't painted a picture for about 30 years.....
Ann is a British artist who lives in California, and who works with a range of media. If you want to know more, have a look at her website: http://www.annbaldwin.com/
Ann made us dive in at the deep (and fast) end by getting the whole class to create a collage on red paper, using pieces cut from magazines, which had to be text based but where you couldn't use whole words!!! We had 30 minutes... There were about 25 of us in class, and the whole class was pretty quiet - you could feel the concentration - while we all snipped and stuck, snipped & stuck!!! Ann randomly selected a few collages to explain about composition and what made them work. Each and every collage was quite different, and some were pretty amazing.
Ann demonstrated her own 'collaging with paint' technique, talking about the paints she likes, the way she works in her studio, and showing us how she creates texture and builds up a painting. Ann's paintings have somewhere in the region of 45 layers of paint on them. Each layer adds depth, and the colours look quite different when layered to the way they would look if you mixed them on the pallette then applied them. I enjoyed the class, and liked using the fluid acrylic paints. When I last painted, I used gouache paints, and this was quite a different experience.
I was quite pleased with the piece I produced, even if I only had time to add about 15 layers of paint. It is A4 size:

A few days after the class, I needed to create a double page spread in an altered board book round robin, so I thought I would use the techniques I had learnt (and the same colours, as those are all the paints I have!!!!) and this is the result:

Sunday, 28 October 2007
Beverly Gilbert classes at Art & Soul
It was with a little trepidation that I went to Beverly's Beads on metal class. I had seen her absolutely fabulous work on her website - http://www.gilbertdesigns.net/ - and I had never strung a bead!!! As it turned out, I needn't have worried at all - Beverly is a fantastic teacher, and I enjoyed the learning!
The class was divided into 2 distinct parts - working with metal, and working with beads. Beverly took us through cutting metal, making holes in metal, stamping metal, & cold metal fixings (rivets! & jump rings). Beverly also checked what we had learnt at various points. Here is the back of the piece I made - a bit messy, but not bad for a first attempt!

In the afternoon, we moved on to the beading part of the class - and the beading was freeform, but with some rules to start off with, in order to 'anchor' the bead embellishment to the metal base. Beverly supplied the beads to those who wanted them - she makes 'bead soup', drawing from 40 or more tubes - and the soup is gorgeous. Beverly offers various different colourways for her bead soups, and the one I used on this piece is called 'tropical surf' - yum!!! I am really pleased with the finished piece, and it has been commented on by lots of people in lifts, airports, shops etc over the last few weeks.

I also took Beverly's 'Beachcomber' class - where we wrapped a beach-related object in a 'bead net' in order to turn it into a pendant. I chose to wrap a large shell. The bead kit is called 'antique copper'. This was much trickier to start with, as we had to work on the piece loosely, and gradually increase the number of 'lines' around the shell to encase it securely. I guess this took me about 2 hours:


and I enjoyed the process so much I began another! I must add a couple more strands and a hanging loop....


Leslie Parsons Art & Soul class
Leslie Parsons 'Joy of Instant Art' was an extended 'light bulb moment' for me. We did create some simple art in class- covering a few slide mounts, creating some neat little 'sewing notion' embellishments, trying our hand at image transfers, but creating the art was not really the point of the class. As Leslie said this was the last art retreat she will teach at, I'm sure she won't mind my sharing her ideas.
Basically, it is all about organising your 'stuff' so that you can find it when you need it. Now, I have boxes and bags full of embellishments and stamped images, but I can never find the right one when I need it. So, I either use another one, or I stop mid-creation and search through all my stuff until I find it, by which time I have usually got right out of the creative mood...
Leslie suggests getting yourself a 'notebook' - or ring binder as we in the UK would call it. You fill the notebook with clear plastic protector pages with all sorts of different sized pockets - some intended for slides, some for coins, some for ATCs, some 4 x 6 photos - whatever kind of pages you can find. And then, you fill them up with your 'stuff'! And, because you can see them all neatly organised, you can always find what you want. Leslie did give us all notebooks with examples of the pages in class - and the one improvement -suggested by another class member - is that you can buy these ring binders with zip-up edges - and this stops your bits and pieces getting lost if you accidentally turn your notebook upside-down!
The other part of the idea is that you do little bits of art when you have time - and maybe while you are watching tv, or out camping - for instance, spend an evening covering slide mounts in a range of papers and colours and put them in the notebook. One day, you will want to 'frame' an image on a project, and you will have lots of frames to choose from... Create a number of small embellishments - I have already created lots of thin moulded pieces from air dry clay - and filed them in the notebook. One day I will have to make an ATC or card in a hurry and I know I will find the perfect embellishment ready and waiting in my folder.
Such a simple idea - but potentially life changing for me!!!!!
Saturday, 27 October 2007
'Surfacing' with Jane Wynn
'Surfacing' with Jane Wynn - this was a metalwork/ jewellry class, where we learnt how to patinate and etch metal, and also how to solder bezels onto metal using a blowtorch, and drill holes in metal. Jane's necklaces & pendants are inspirational, she was a good teacher and we all enjoyed a great class. I even enjoyed the blowtorch, but wonder if i will ever be able to drill a hole in metal with a Dremel without skeetering off the edge of the metal or spinning the piece around on the drill bit! Here is the half finished necklace I made in class:

Jane has a new book out: http://www.wynnstudio.com/index2.html which details the techniques she taught in class. I would recommend it highly!

Jane has a new book out: http://www.wynnstudio.com/index2.html which details the techniques she taught in class. I would recommend it highly!
Portland Art & Soul Retreat
I attended an Art & Soul retreat for the first time. These well organised events run in different venues at different times of the year (see http://www.artandsoulretreat.com/ for more info).
I chose to go to the event in Portland as that meant I would also be able to meet Zeborah - an online friend. We had a fantastic time staying up late, talking non-stop, playing in her studio, and even got out of the house once or twice when it stopped raining!!!! Zeborah's husband was also lovely, and very patient with the disruption of their normal routine.
The A & S event ran from Tuesday 2nd October - Monday 8th October, and I attended the opening 'gala evening', 6 all day classes and 4 evening classes. It was a lot to pack into the week, but I had travelled a long way, and wanted to make the most of the event. I shared a room with Jean van Brederode (charmdimsur.etsy.com) who was a great room-mate to have - considerate and friendly!
I will post entires on each class separately....
My Poor Neglected Blog & 'The Suitcase'
I have been away from home for almost 4 weeks, and my poor blog looks very neglected! I ahve had such an exciting and fabulous trip - to Portland, Oregon, USA & also to Wisconsin, USA.
I shall make some 'catch up' entries soon.
My 'altered suitcase' obviously stood out from the crowd as far as the US TSA department was concerned - they opened it and searched it on each and every part of my journey and left me a nice slip of paper explaining things, but thankfully didn't remove any of my tools or art supplies. I do wonder what they thought when they searched the case - it must have looked odd on the x-rays as it was full of tools and paints and odd items, with just a few clothes used as padding to stop the other stuff from bumping together with resultant damage!!!
Sunday, 23 September 2007
Altered Art????
At the end of our last holiday, we wasted a lot of time
at the airport looking for our suitcase because
somebody else picked it up up by mistake.
We finally caught up with them at the bus stop outside
(purely by chance) and exchanged bags.
I always put my name and address inside my suitcase,
so we would probably have got it back in the end,
but I don't need this sort of hassle!
I wanted to be sure I would be able to
spot my suitcase on an airport carousel.
spot my suitcase on an airport carousel.
It was a sort of plain silver colour.
Now it is themed with the season!

I'm not sure it's finished, but I like it better already!
And I certainly won't confuse it with anybody else's suitcase.
Just hope nobody else likes it enough to steal it...
Now it is themed with the season!

I'm not sure it's finished, but I like it better already!
And I certainly won't confuse it with anybody else's suitcase.
Just hope nobody else likes it enough to steal it...
Saturday, 22 September 2007
Art & Soul Necklaces
I am travelling from Wales to Portland next weekend - as I am attending my very first 'Art & Soul' retreat. This is a week of luxury in a hotel (no cooking, no washing up, no food shopping, no worrying about what other people want or need), just playing with arty stuff and learning new techniques, playing with new materials, and meeting like minded people - my idea of BLISS!!!!
Part of the event is trading pieces of your art with others. I have made about 50 necklaces from laminate samples, some of which I have uploaded here. I have also made quite a few ATCs to trade. I will be taking lots of pictures of my time in Portland, and also of the time I spend with friends in Wisconsin (the second part of my trip) and I am sure some of them will eventually find their way onto my blog, so keep your eyes peeled!


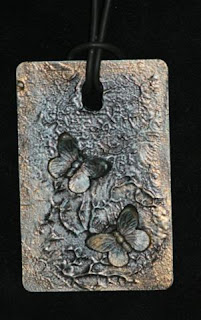
Part of the event is trading pieces of your art with others. I have made about 50 necklaces from laminate samples, some of which I have uploaded here. I have also made quite a few ATCs to trade. I will be taking lots of pictures of my time in Portland, and also of the time I spend with friends in Wisconsin (the second part of my trip) and I am sure some of them will eventually find their way onto my blog, so keep your eyes peeled!


Subscribe to:
Posts (Atom)