Tuesday, 20 December 2011

Beaded brooch

I have a very classy and elegant friend whose wardrobe only contains clothes in black and white.

Very clever idea, which simplifies her life, because everything in her wardrobe goes with everything else, she never even needs to think about that, she can just pick anything out and it goes together...

I decided to make my friend a Christmas gift as she has been very kind to me this year, and I wanted it to be something she'd find useful - she's not a crafter and I'm always hesitant about making things for non-crafters as I'm not sure what they will appreciate!

I finally decided to follow a pattern I'd found for a beaded flower brooch. I had no idea quite how long it was going to take me to make ( 3 evenings!!!!) and instead of going for a carefully chosen mixture of beads of one colour but different textures as the pattern specified, I thought I'd try black and white so it would go with my friend's clothes.

I often dislike projects when I've finished them, especially if they've taken some time to make. That's usually when I know they are finished! Mostly, when I look again a few days later, i like them again. This time I'm really not so sure....


Maybe it's because I'm not a black and white kind of person. Maybe because there are starker contrasts than I usually include in my pieces. Maybe it will grow on me. Maybe.

Hope my friend is happier with it than I am - but I gave it on the understanding that if she didn't like it, she isn't obliged to wear it from politeness, but can donate to the charity shop!

Wednesday, 23 November 2011

Christmas presents

I took part in a '12 days of Christmas' swap again this year. I love this swap, it needs 13 players, and each player makes 12 gifts which are swapped out by the hostess.

I open a gift a day until Christmas Eve, others save all theirs for Christmas Day!

Here are my gifts, all wrapped up and ready to mail. Usually I make my own wrapping paper too, but this year's gifts were 'plan B', as 'plan A' went pear-shaped, and I ran out of time!
I used some special handmade papers I bought years and years ago, instead, and was busy wrapping (badly) ready to mail on the way to the airport for my flight to Germany. Talk about cutting it fine.....


Plan A was needlefelted silk 'scarfettes', but the embellisher machine went on strike after number 7, and I couldn't get it sorted. I will post about those another time, but the books below were what kept me up late for a couple of nights in November (this post has been delayed until I knew everybody had opened their gifts).

The covers are made from foam board - very useful stuff, as it is light, yet strong. It comes in black and white, and takes paint well. I cut the covers to size, then coated the edges and one side with a generous coat of gesso. While the gesso was still wet, I stamped into it (wash the stamp immediately after you've done this), then left to dry.

I tore textured paper into strips and wrapped them around the edges of the covers, so that there was textured paper covering at least the first half inch of each side. I stuck the papers down with matte gel medium. Once dry, I started painting. Each cover had several layers of Golden fluid acrylic paint - the more layers you add, the more leathery the look. These covers had about 10 layers of paint.


The final steps for the covers was to line the reverse side with velvet paper to finish them off, then to highlight the stamped image and textured papers. You can use anything metallic for this step - gilding wax, iridescent oil pastels, Shiva/Markal paint sticks. I used a mixture of Treasure gold gilding wax and Sennelier iridescent oil pastels.

Finally, cut the papers to size and bind the books - I bought myself a Bind It All a few years ago, but you can just punch holes and use book binding rings. This might have been the best plan for me, because once i had punched all the papers I discovered that the covers were too thick for the Bind It All, and I had to punch every binding hole by hand.... Ho hum!

Sunday, 23 October 2011

Proverbs ATCs

Three ATCs on the theme of 'proverbs'. The backgrounds were all created by stamping glossy white card with Brilliance ink (white, silver or platinum all work), then drying with a heat gun, before using a sponge to rub dye inks over the top, then polishing firmly with a dry baby wipe.

The words are stamped onto a background paper created by randomly adding paints and spays to some cream card, and the images are stamped and embossed onto the background.


Thursday, 13 October 2011

Conjoined ATCs

Another swap, another theme.... 3 ATCs joined together in some way, so that they can stand up without any support.

I used 6 pieces of mountboard, painted with Ecopaints in Clay.

For the fronts, I stamped and embossed the left hand side of each ATC with Stewart Gill metallic copper embossing powder. The stamp is 'Stately' by Acey Deucy. I then overstamped with a Stampers anonymous stamp and Brilliance Lightning Black ink. I found 3 images, and'framed' them with very fine copper peel offs.


For the backs, I used the same two stamps, but embossed the Stampers Anonymous one, and overstamped with the Acey Deucy one. The ATCs were glued together, trapping some bronze glittery ribbon between the layers.


Tuesday, 11 October 2011

Autumnal colours mixed media postcard

Autumnal colours of browns, reds, oranges, yellows and greens... inspiration is all around me.

I made this postcard by painting some canvas with 2 or 3 colours of Golden fluid acrylic paints, then sewing small silk squares onto it using perle and metallic threads and embroidery stitches. The whole thing was mounted onto a piece of painted watercolour paper, which I swiped with a dark brown Stazon inkpad.


Sunday, 9 October 2011

Blue & Green ATCs

Made these thee blue & green ATCs for an upcoming swap.

The background is dyed scrim, glued to cardstock. For the first one, I added some dyed silk scrim down the left hand side, and sewed some sequins and beads to it. I stamped a piece of green painted watercolour paper with Versamark and embossed with Moonlight Obsidian Teal embossing powder. The stamp is 'wild asparagus' by My Mind's Eye.


The second ATC uses the same background, with some large domed sequins and beads down the left hand side, and an embellishment made from a piece of Friendly Plastic. I ironed the Friendly Plastic between two pieces of silicone baking paper until it was thin, allowed it to cool, peeled the paper off, heated it with a heat gun, then stamped into it with a Stamper's anonymous stamp. I edged it with gilding wax, then sewed through it into the card using 4 tiny sequins and some tiny beads.


The final ATC has the same background with sequins and beads sewn down the left hand side, and the image (Invoke Arts) is stamped into some mixed green and blue Angelina Fibres.


Friday, 7 October 2011

Inspired by Angie Hughes

I've had a bit of a play with my sewing machine.

I've been on a couple of day courses with Angie Hughes, and her work has inspired me whilst making a mobile phone case for Wendy, and a Kindle case for Annie.

This silk lined mobile phone case is red velvet, with layered appliqued green and orange silk squares, covered with a red/orange shot organza.

I hand embroidered the details on the silk squares, then used the sewing machine to sew around the silk squares, and 'free motion' embroider the rest of the case.


I completely forgot about using stabiliser when machine embroidering, so the velvet all scrunched up - this gave a nice texture, but meant I only just had enough fabric for the phonecase (whereas I started with a generous amount and expected to have to trim!). It also means the finished phone case is a bit 'squiffy' (sorry, Wendy, not as good as I'd hoped!).

This sewing stuff is big learning curve for me...


The silk lined Kindle case was made using similar techniques but I remembered the stabiliser (I used pelmet vilene), so has a much smoother finish, and the background free motion embroidery is granite stitch.


Wednesday, 5 October 2011

Inspirational women - Beryl Taylor


This ATC was made for the theme of 'inspirational women'. I thought about who I found most inspirational in terms of my artwork, and decided Beryl Taylor's work always makes me feel like creating, and I love her style so much that I am happy to create similar work (as far as I am able).


Saturday, 24 September 2011

Odd shaped art

I recently took part in an 'odd shaped art' swap, where I made a series of 2.5 inch by 6.5 inch collages. I thought I'd try a (new to me) collage technique, mixing images, text and painted backgrounds, with some stamping on the backgrounds.

Here are the results:


Thursday, 18 August 2011

Random ATCs

Made various ATCs for swaps recently. The first set were for the theme of 'beauties'. I wanted them to be dramatic but not morbid, so I hope the gold touches lift them far enough out of looking funereal. The images have been trapped under some subtly gold organza. Remember you can enlarge the images by clicking on them if you want to see more detail.


These - on the theme of black and white - were created by fusing and marking man made fabrics with a heat tool - the Margaret Beal heat tool has consistent temperatures and fine points, which makes this type of work easy.


This ATC was made for the theme of 'Abstract'. I used tissue paper which had been used for mopping up excess ink when using colourwash sprays, and dabbed it with painted bubble wrap. The glitzy bits are glitter glue, and the orange squares and small circles are painted and stamped cardstock.


Sunday, 24 July 2011

Visitors to this blog

I just looked at the little map counter which shows me where all the visitors to this blog come from - and was astounded to find that people from 112 countries around the world have been to see what I've been up to!

I hope you all enjoyed your visit, and also that all future visitors have some fun too.

Monday, 18 July 2011

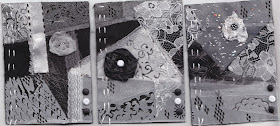
Fused or soldered fabric ATCs

The theme for these ATCs was 'black and white'. I used a black acrylic felt background, and layered geometric shapes of black and white synthetic fabrics and nylon lace on top. I used a Margaret Beal soldering iron to fuse the fabrics together and also fuse them to the background.


I also used the soldering iron to create patterns in the white fabric by 'doodling' into it freehand and using metal stencils.

I added some small organza 'roses', made by cutting circles of organza, layering them on top of each other, placing a glass bead in the centre, and using a heat gun to shrink the edges of the organza around the glass bead. I stuck the layers together and adhered them to the background with brads. To finish the ATCs off, I added a little running stitch down the edges and a few brads.

Saturday, 9 July 2011

Hanging ATCs

I had a moment of inspiration and made these ATCs, incorporated into a hanging device.


The ATCs were made using an embellisher machine and silk rovings embellished onto felt. I then cut some circles and leaf shapes out of silk fabric and embellished them onto the backgrounds. I added simple hand embroidery stitches - just fly stitch, backstitch and french knots - to add texture to the silk 'flower's and' leaves'.


I used some of the silk rovings to make 2 felt strips to hang the ATCs, and then embellished organza circles onto a piece of organza to add texture and tie in with the embellished circles on the ATCs. I embellished the ATCs onto the organza hanging background.

Sunday, 26 June 2011

Felted & embroidered ATCs

I know. You'll be shocked. I've made some art and am posting it to my blog. I have actually made more art recently but haven't found the oomph to upload it. I made these this morning and was so pleased that I thought I'd share.


These were made by using the embellishing machine to felt all sorts of bits and bobs of silk, organza, fibres, rovings, bits of silk rods and more to a base of emerald green felt. Once felted, I added the odd hand embroidered stitch, some sequins and a couple of organza 'flowers'.

Needless to say, they look much better in real life - really vivid colours.

Friday, 13 May 2011

Altered box

I altered this sturdy cardboard box - which is about 5 inches by 5 inches - to turn it from a plain brown box into something slightly more attractive.

I used light moulding paste and a stencil which I bought from Crafty Notions to create the raised design.


Once dry, I sprayed the whole box with a variety of colourwash sprays - Radiant Rains, Crafty Notions sprays, Sticky Fingers Sprays and some from Outside the Margins in the US. Once that was all dry, I added colour to the raised areas using several colours of Treasure Gold.


To finish It off, I lined the box with velvet paper,
which I bought from Marco's in the US.

Saturday, 2 April 2011

Olied paper experiments


Many years ago I created a 'faux vellum' by adding baby oil to copy paper. the results were not inspiring enough for me to try it a second time.

However, Maggie Grey has taken the technique futher in her new book by using a variety of papers and adding paint into the mix. The results can be very good, and create a surface that is suitable for papercrafting or stitch.

Annie came to stay last week and we had a little play. We took a selection of papers - a printed brown paper bag, a sheet of copy paper, a vintage map, some old sheet music, and some printed scrapbook papers.


We also used baby oil (but you can use almond, sunflower, lavender or whatever oil you like) and some cheap acrylics. I later tried more expensive acrylics and like the results of that the most!


At a very basic level, you can add oil to a plain sheet of copy paper,then leave in a cool place or half an hour to dry out before painting thinly with acrylic paint (or paint first, oil second) then crumple it up a few times. This looks fine.

We then experimented by stamping the copy paper first:

then painting:


which created a nice paper after crumpling - I don;t seem to have taken a pic of that on its own but it is shown in the last pic of this post.

Next I tried simply adding oil to printed papers - you can see the backs here to show the difference between oiled and unoiled:


and this made a nice surface for stitch, again see final pic in this post.

But this is my favourite - copy paper, painted with Jo Sonya metallic paint:


overpainted with cheap acrylic, paint lifted with a Cory Celaya stamp:


then oiled and crumpled, it looks and feels wondeful:

Here's a pic of all the papers we experimented on, from left to right - painted printed paper bag, copy paper, maps, sheet music, printed papers.


The map and sheet music were the least successful - the papers were too heavy, and probably too old, as they cracked and holes appeared during the crumpling stage. The printed papers were quite heavy but worked reasonably well, but the thinner papers worked the best.

Sunday, 23 January 2011

I made some art!

Well, it's been a long time since I posted to this blog. A lot has changed in the last few months, and the desire to create has been channelled into work activities and sorting through my belongings to only keep things I really can't bear to part with, and decorating parts of my house to make it more likely to sell quickly.

This week, my good friend Annie came to stay, and we went to Ledbury for two days with Wendy, and enjoyed ourselves in workshops with Angie Hughes. We learnt to make fabric tag books using printed tissue and fabric run through an inkjet printer - the possibilities are endless... We also learnt how to create print blocks from heat mouldable foam, and used these to print and overprint on fabric with acrylic paints and fabric paints. I will share some of those projects when/if I finish them.

Maybe two days spent relaxing and creating in good company got my muse excited because yesterday I made two sets of ATCs and today I made some more! And I enjoyed it. I have made some art over the last few months to fulfil my swap commitments, but I didn't really enjoy doing it.

This first set of ATCs are made form fabric paper backed with felt, with gold stitching round the edge. The images are from PaperWhimsy, I found some collage sheets I bought years ago when I was cleaning and clearing, and decided to use them. I laid organza over the images and stitched the organza all around the images, trapping them on the ATCs. I added rainbow organza ribbon, overlaid with deep red satin ribbon, and added beads as I sewed the ribbons to the ATCs.


The second set are also made from a fabric paper base, using some Xmas tissue wrapping in the process. I sewed some ribbon left over form Xmas down the side, and added more PaperWhimsy images, frames with Stickles. I sewed a sequin and bead in the corner, and stamped some words onto fabric scaps, before adding them to the ATC using Bondaweb. Annie suggested the words after looking at the faces of the three girls, and most appropriate they are too!


I'm still feeling quite creative, but am off to stay with a friend for a week, so may not get chance to make much.

I'll try not to leave it another 3 months before my next post!