I once received a beautiful Stampboard triptych from Trizzy - this is my version, which is very different! I used watered down lettuce and stream inks, stamped with black Stazon, and added Golden mica flakes for a bit of glitz. A couple of paper flowers and a gem or two, and it was finished. I just glued two tiny brass hinges to the back, and it stands up nicely!
Monday, 21 June 2010
Sunday, 20 June 2010
Needle felting
A couple of weeks ago, two friends of mine pointed me in the direction of a brand new Merrylock Embellishing machine on EBay. I was very fortunate to win the machine for £62.99 and I collected it 10 days ago. I didn't find the time to start playing with it until Thursday, and I finished my first project today.
I have seen a number of felted projects which have been beautifully done, but using gross (in my opinion!) colours. I thought I'd make something subtle. I took a base of acrylic felt, and felted some grey-black wool to it. Once I'd covered the felt and made a nice base, I took some more yarn and wound it into spirals, and felted those to the base. I added some simple fly stitching in a shiny crimped yearn, and some french knots in a hand dyed grey & pink perle cotton, and I *think* it's finished.
I'm not sure though - part to me feels there should be a focal point, but I'm not sure what it could be, or where to put it. I'll look at it over the next few days and see if anything suggests itself...
Friday, 18 June 2010
Altered Element DT surface pack - shrink plastic
Shrink Plastic. Versatile stuff which comes in black, white, translucent and clear. Reputation for being tricky to use. But is it? If you work with it on a non stick surface, and use a 'hairdryer' type heat tool, I find it behaves itself. Just remember less is more when adding colour - what looks like pastel colour will turn out quite brightly! I use Stazon, Brilliance and Fluid Chalk inks successfully (although you have to leave the Brilliance to dry overnight or shrink the plastic VERY carefully!) Once it starts curling I often aim the heat gun at the underside and it kinds of curls back down.
This is a very different way of using Shrink Plastic - 'distressed shrink plastic', as taught to me by my friend Jessie in New Zealand. Take a piece of shrink plastic, a heat gun, a non stick craft sheet, a texture rubber stamp, and a metal skewer (or use your craft knife, palette knife or similar).
I used a piece of translucent shrink plastic about 2 x 2.5 inches.
Cut the shrinky stuff into irregular triangles and kite shapes. You can also punch holes in them at this point, it adds more texture to the finished piece. Pile them up on the craft sheet.
Have your metal skewer ready, and your rubber stamp. Heat the shrink plastic with your heat gun - preferably a 'hair dryer' type (it doesn't blow things around as much). It will start curling, if any pieces decide to leave the pile, push them back. when it looks as if it's all or nearly all shrunk, stamp into the pile with your rubber stamp - push down hard and hold the stamp there for about 30 seconds.
I wish I had another photo to show you how it looks now, but the one I took was too fuzzy.
Your shrink plastic will look textured, and have an odd shape. It might not look too inspiring at this point. Persevere! Add colour - I use alcohol inks, but I guess acrylic paint or Stazon or Brilliance ink would work.
Once coloured, apply wax rub on to the edge with your finger, then go lightly over the top with the rub ons. I use Treasure Gold (Wendy will be surprised LOL) because of the depth of colour and the fact that it dries to a permanent finish. You can use the 'palette' type, and either use a fixative or wait a week until they have set permanently.
This is what you can expect it to look like at this point.
(sorry about the slightly fuzzy photo)
Here's another.
And this is how it adds dimension to my finished chunky book page - the page had looked too 'flat' to me, but I needed the embellishment to be unbreakable, quick, easy, and in the right colours for the page. This simple 'distressed shrink plastic' element does all of that, and was very quick and easy to make.
Monday, 14 June 2010
10% discounts at the Altered Element during England games
Read more about how you can get 'World Cup discount' on all Altered Elements orders of wonderful goodies during England games:
http://alteredelement.blogspot.com/
Wednesday, 9 June 2010
Altered Element DT pack
This month's Altered Element DT pack is all about surfaces. It contained sheets of metal, tyvek and translucent shrink plastic, mini canvas boards, chipboard, stampboard, fusible film, glass squares, some tea dyed fabric, some grungeboard and some polymer stamps form Artemio.
Gazing into my crystal ball, I foresee many projects....
I started with a mini canvas which incorporated fusible film and shrink plastic.
Fusible film always looks much better on a dark surface, so I coloured the canvas with the Crafty Notions opaque black colour spray.
I coated the canvas with PVA glue ot hold the film in place, then covered the canvas with a sheet of silicone paper, and ironed the film onto the canvas - my iron gets used more often in art projects these days than it does for smoothing out creases in my clothes!
The more heat you apply, the more colour change you get in the fusible film, but you do have to be careful not to heat it too much or it disappears in patches - if this happens to you, just lay another piece of film over the top and iron more carefully, it will fuse to the layer you've already added without any need for glue. This is how the canvas surface covered with fusible film looks.
Next, I considered embellishments. I punched 5 'inchies' of translucent shrink plastic, and daubed Stewart Gill Byzantia paint thickly on top - using two colours.
When heated, the plastic shrinks as the paint dries, and the surface of the paint forms lovely little shimmery ruffles...
I used some angelina fibres, ironed between two pieces of silicone paper, to make a small sheet of texture, and ironed that onto the left hand side of the canvas. I glued the small shrink plastic and paint squares onto the angelina, then added a transparency and a german scrap 'frame', and here is the finished canvas:
Altered Element Upcycle
My purple pack of pure pleasure arrived from the Altered Element last week - each item is beautifully wrapped in brown paper bags and purple tissue, and it always feels like opening Christmas presents!
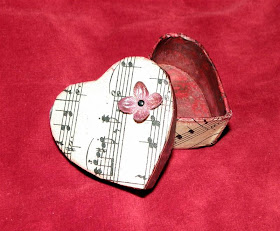
This month's Upcycle element was a very old booklet of sheet music, and I did use some of it in the hanging ATCs in the last blog post, but I also used it more obviously to create this little heart box.
I cut the sheet music and glued it to the box with gel medium - I like to use this because it is 'drier' than glue and tends not to make the paper bubble when adding it to a solid surface. Once adhered and trimmed, I painted a fabric flower, the rim of the lid, and the interior of the lid and box with Radiant Rain in Jasper Red. I gave the whole box a coat of acrylic wax to give it some protection, and added the flower with a tiny brad.
Sunday, 6 June 2010
Hanging ATCs
I am in a swap where we made a set of 3 hanging ATCs - any theme, colour scheme, media or way of hanging. I decided to combine metal with paper, and made 3 ATCs in my favourite colour combination of turquoise and copper.
The hanging 'mechanism' is 5 pieces of copper wire, twisted together and curled at the ends. I patinated the copper lightly so it has some areas of light turquoise verdigris. The ATCs are attached to the twisted wire 'hanger' using jewellery findings - eye pins, head pins & bead caps.
The ATC backgrounds are deli paper sprayed with colour wash sprays, glued to cardstock. Old sheet music which has been stained with watered down Crafty Notions Creative Colour Spray in turquoise, plus some which has also been dry brushed with white gesso, are layered onto each ATC. Tags sprayed with Sticky Fingers Maple winter ink colourwash spray and the turquoise are wrapped with more sheet music with words stamped on top, and punched flowers with tiny brads were added . To finish the ATCs, I glued on copper coloured metal embellishments from the US, and a letter 'A' triple embossed on cardstock.
I hope Annie likes them!
Leonardo chunky book page
Leonardo Da Vinci was such a special man - a scientist who recorded his ideas and inventions through drawing, as well as an artist who painted the most fabulous paintings. I am involved in a Da Vinci themed paperbag book, and have finished my first page.
I mixed a little yellow ochre and a drop of transparent red oxide with a dollop of liquid gloss medium and a smaller dollop of white gesso. I used this mixture to coat Fabriano hot press watercolour paper, then dabbed it with a crumpled up magazine page to texturise the surface and remove the brush marks. I used a piece of Ranger Cut'n'Dry foam to rub around the edges with yellow ochre chalk ink, then a thinner layer of burnt sienna on top.
I stamped the image with the same burnt sienna fluid chalk ink.
The tag was a manila shipping tag, which I dabbed with black, burnt umber, Payne's grey and bronze acrylics, again using a crumpled magazine page. Once dry, I applied slivers of textured papers (painted bronze to match the background) down the right hand side, and stamped and embossed a pen down the left hand side, before adding a slip of paper stamped with the word Leonardo coloured to match the main page. A few fibres threaded through the tag finished the page off nicely.